Goetia

The original walkthrough can be found here.
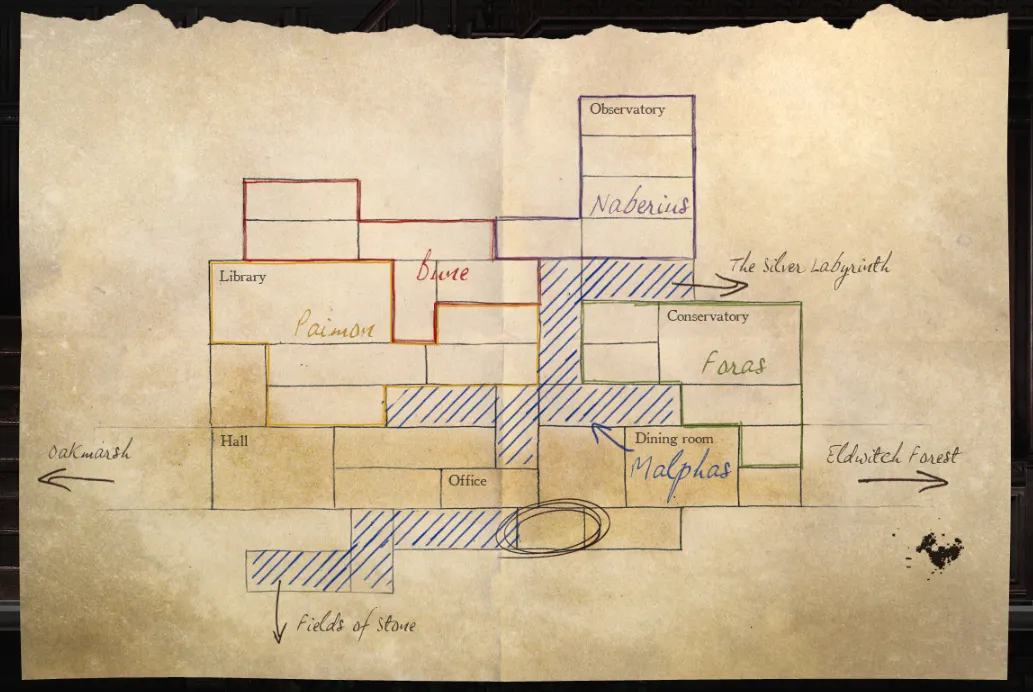
1 Part 1: Manor, First Areas
- Fly to the right and through the door to enter the manor.
- Open cabinet near front door.
Codex: Spirit map
- Continue flying right until you worry what your father will think when he sees you.
- Head upstairs.
Codex: Alice In Wonderland note
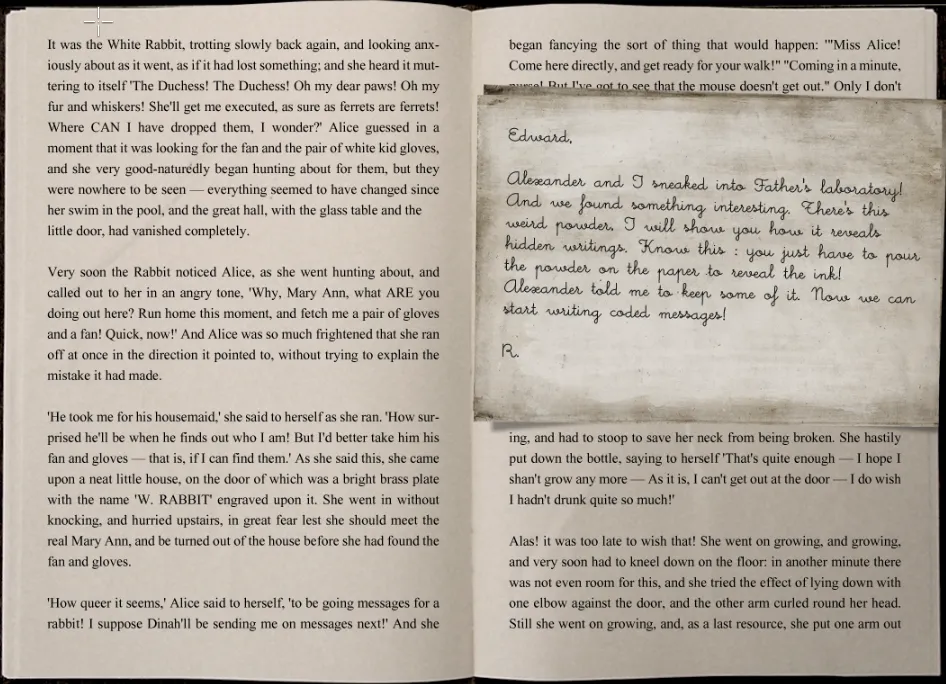
Codex: Sigil doodles- Open key collection.
- Move Virgin Mary statue.
- Flip switch behind statue.
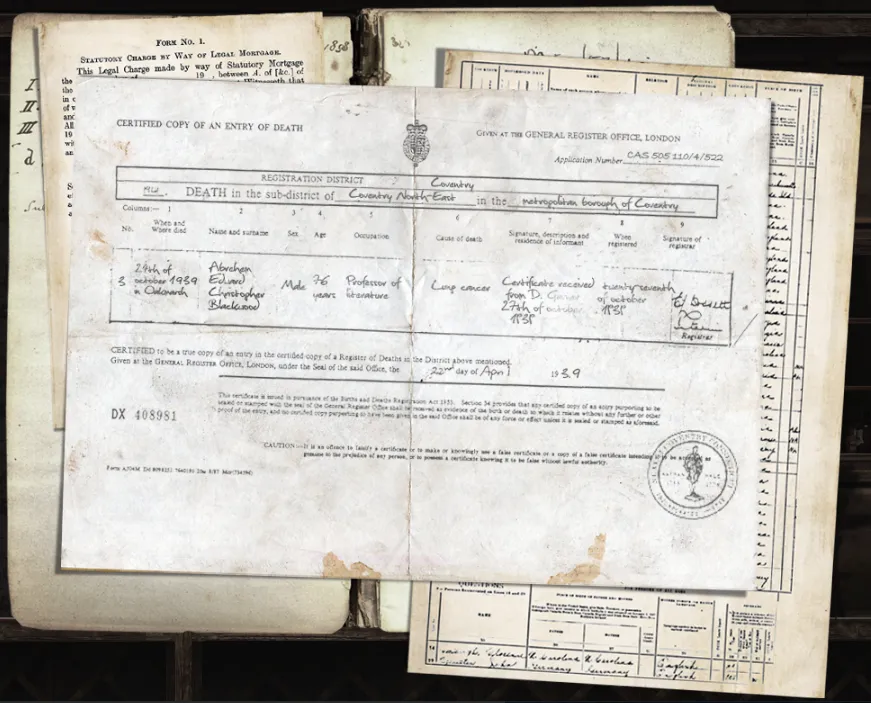
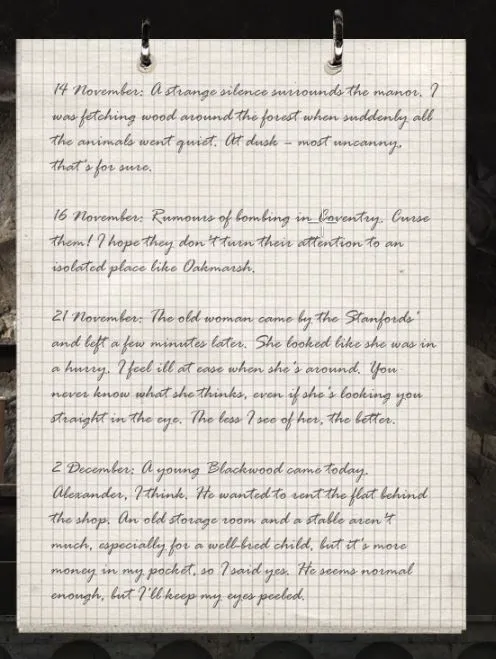
Codex: Death certificate
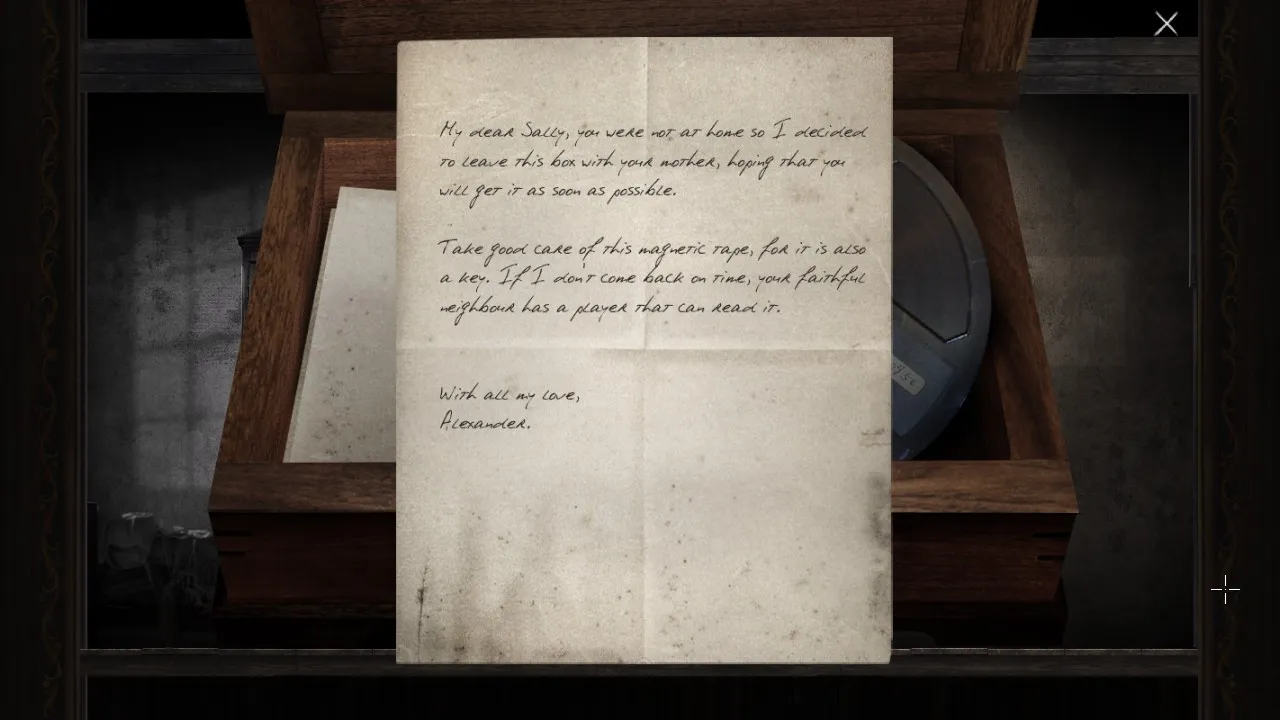
- Father’s lab now accessible. Go there.
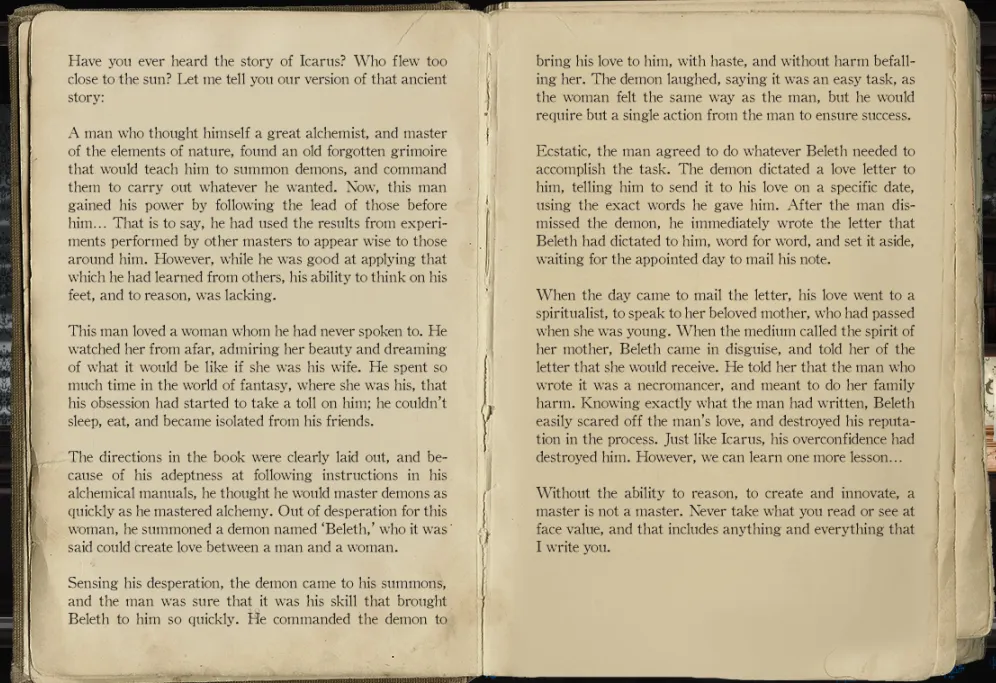
Codex: Story of Icarus
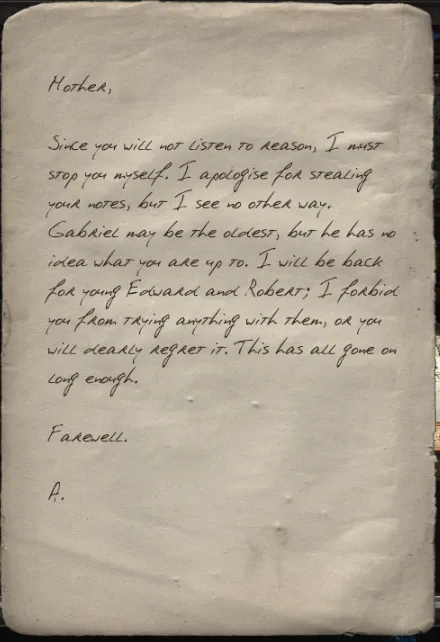
Codex: Mother, listen to reason letter
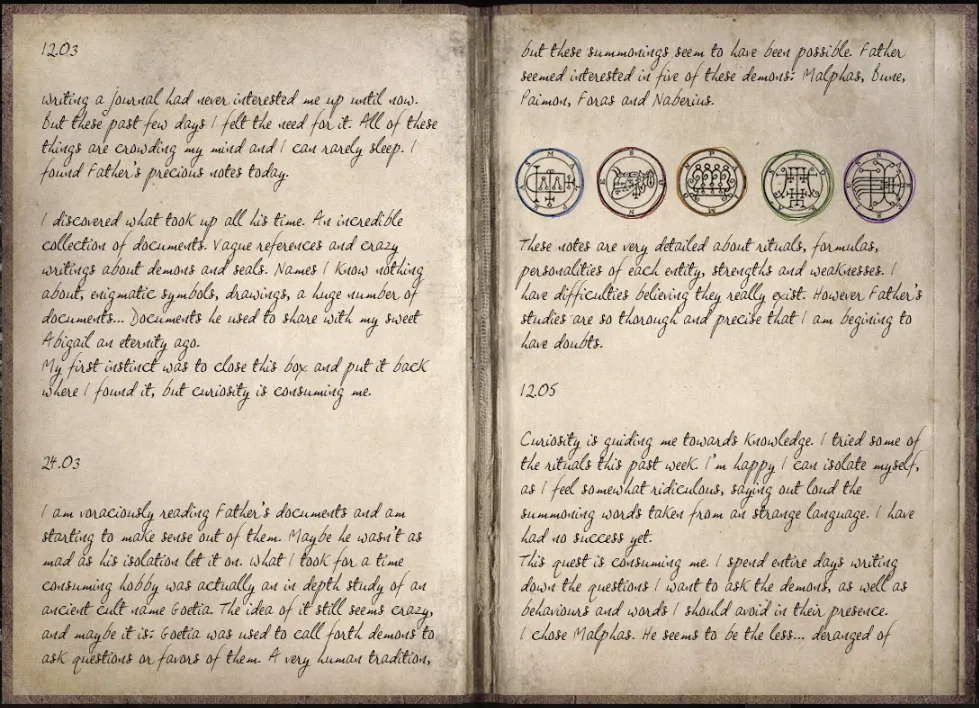
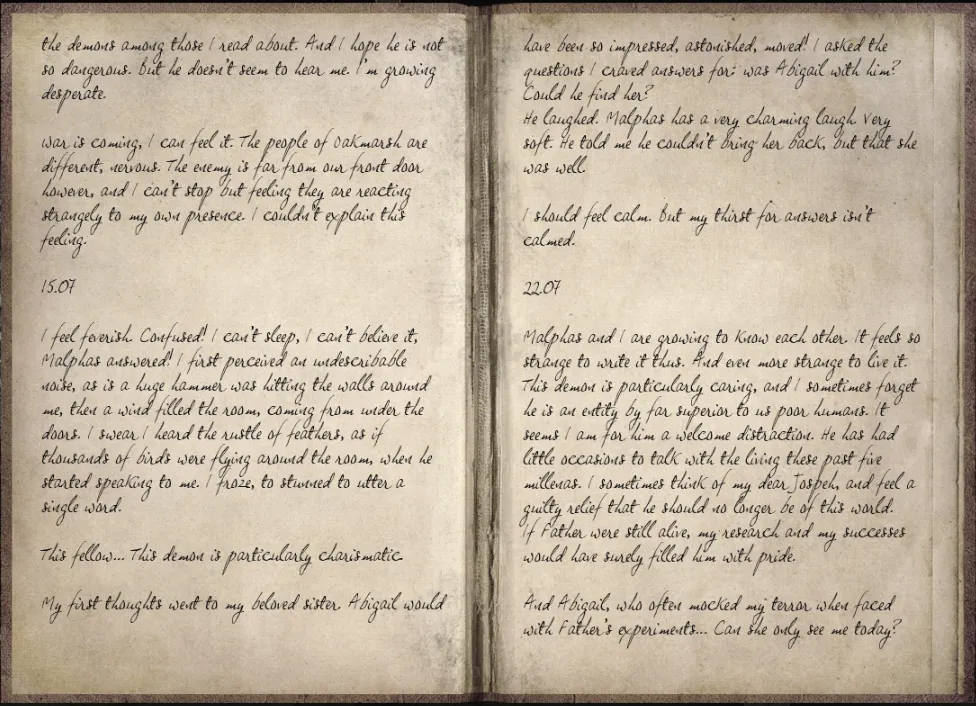
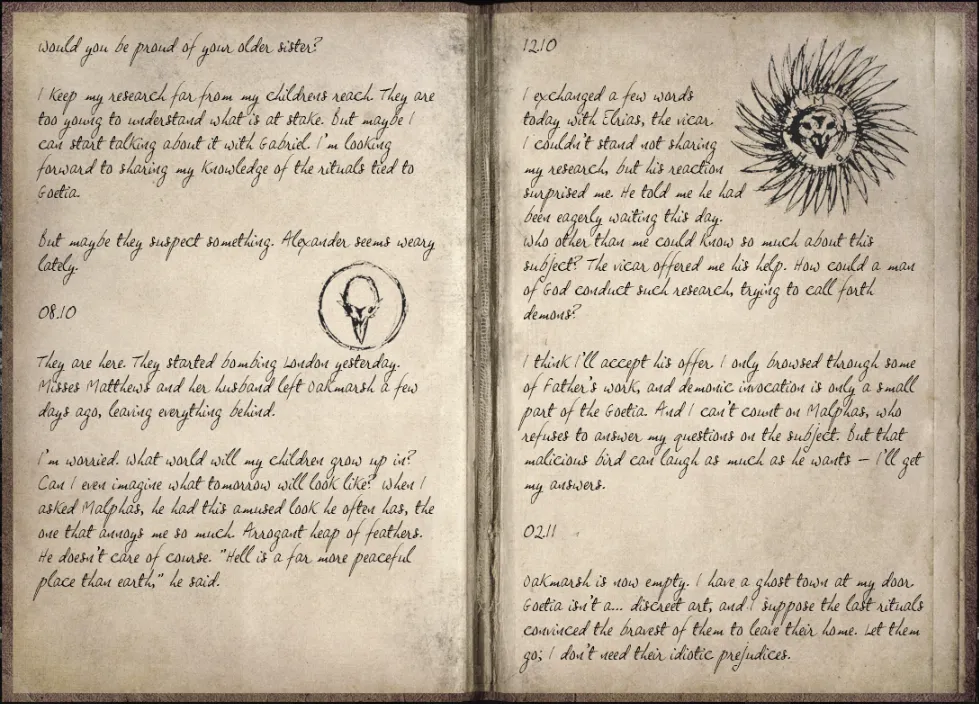
Codex: Demon notes journal
- Exit right and fly up to the second floor. Continue right. Meet Malphas.
Steam Achievement: “First encounter, Make contact with a demon.” - Head down, down beneath the floor to the kitchen. Note blank(?) page. Note combination lock on left.
- Also notice torn pages(?) on the ground.
-
Fly back up to dining room. Open dumbwaiter.
-
Carry box of powder (one screen to the left) into dumbwaiter.
-
Fly down to kitchen.
-
Call dumbwaiter.
-
Carry box of white powder to blank(?) page and use it. Note clue.
-
Fly to dining room. Examine paintings, note ages. Do math.
-
Solution of kitchen door lock: (click to expand)
Enter "1908" into kitchen door lock. -
Fly left into new area.
-
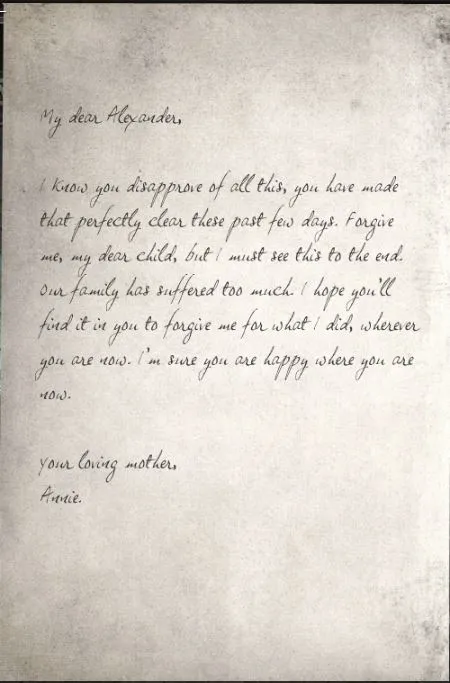
Codex: Note to Alexander from Annie.
- Hear a noise in the upstairs hall.
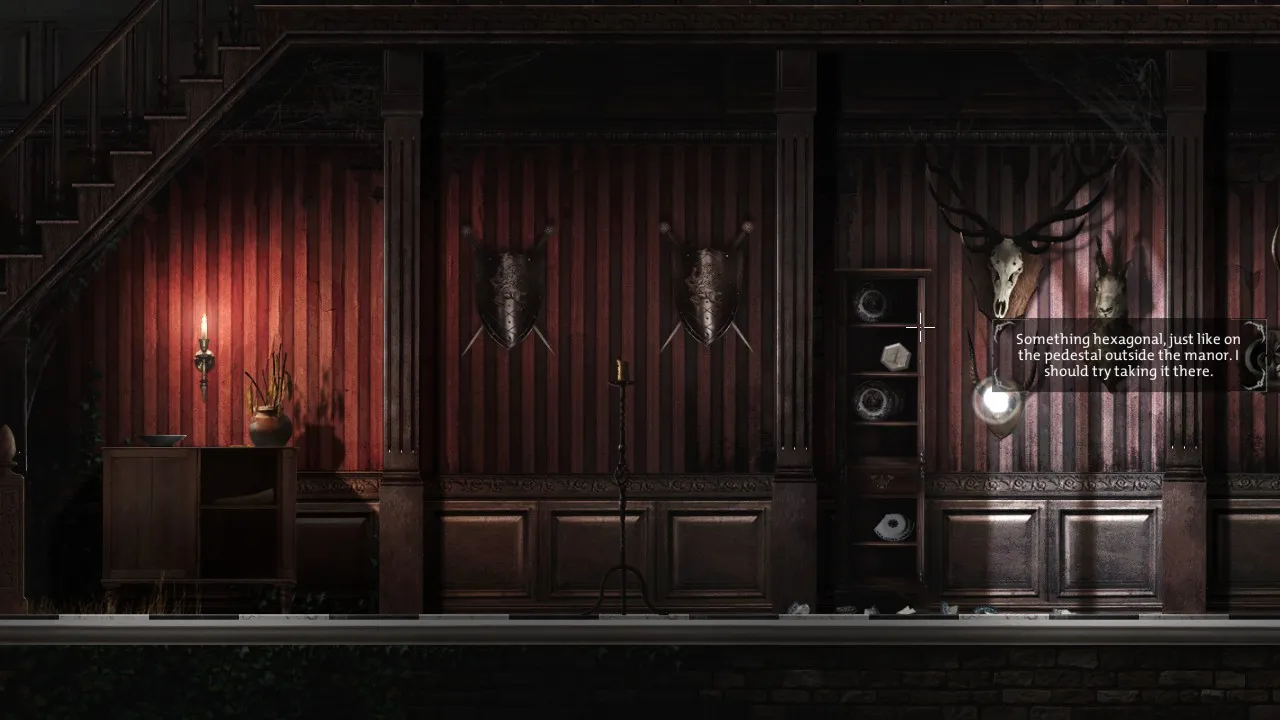
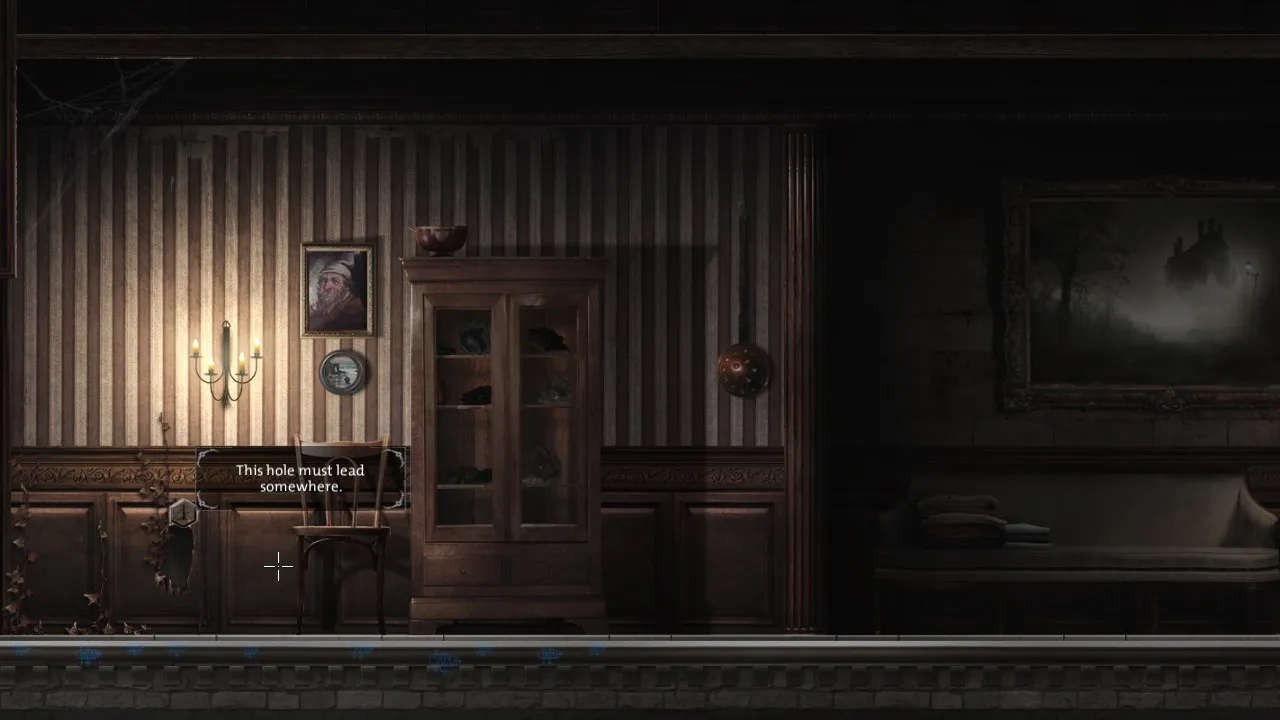
- Note broken crockery near front door. Find hexagonal shape.
- Open door to the right.
- Carry hexagonal shape to the right, through the door, and out the hole in the wall immediately past the doorframe. Fly left until outside.
-
Use hexagonal shape on pedestal outside the gate.
-
Fly down into graves. Find key. Fly key up to the second floor and in through open window.
-
Fly through the hole in the floor down to the first floor, then to the right. Open doors as needed while flying. Stop at desk underneath locked cabinet.
-
Use key to unlock cabinet.
-
Codex: Malphas, opposite sigil. Steam Achievement: “Apprentice exorcist First attempt at banishing a demon.” You may now fly through walls previously blocked by blue symbols.

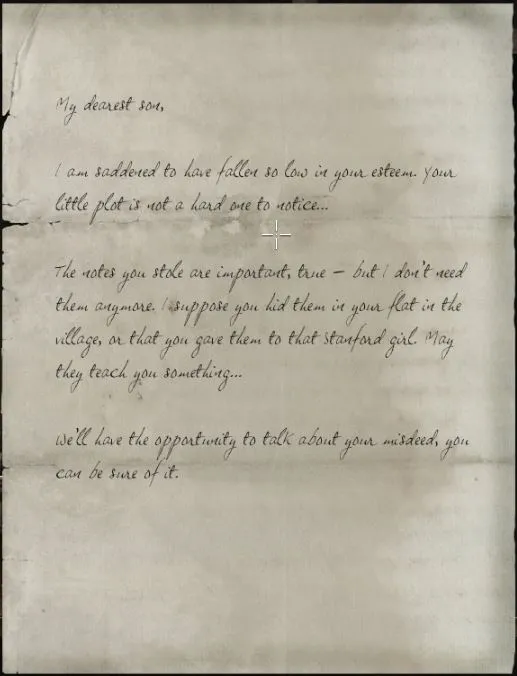
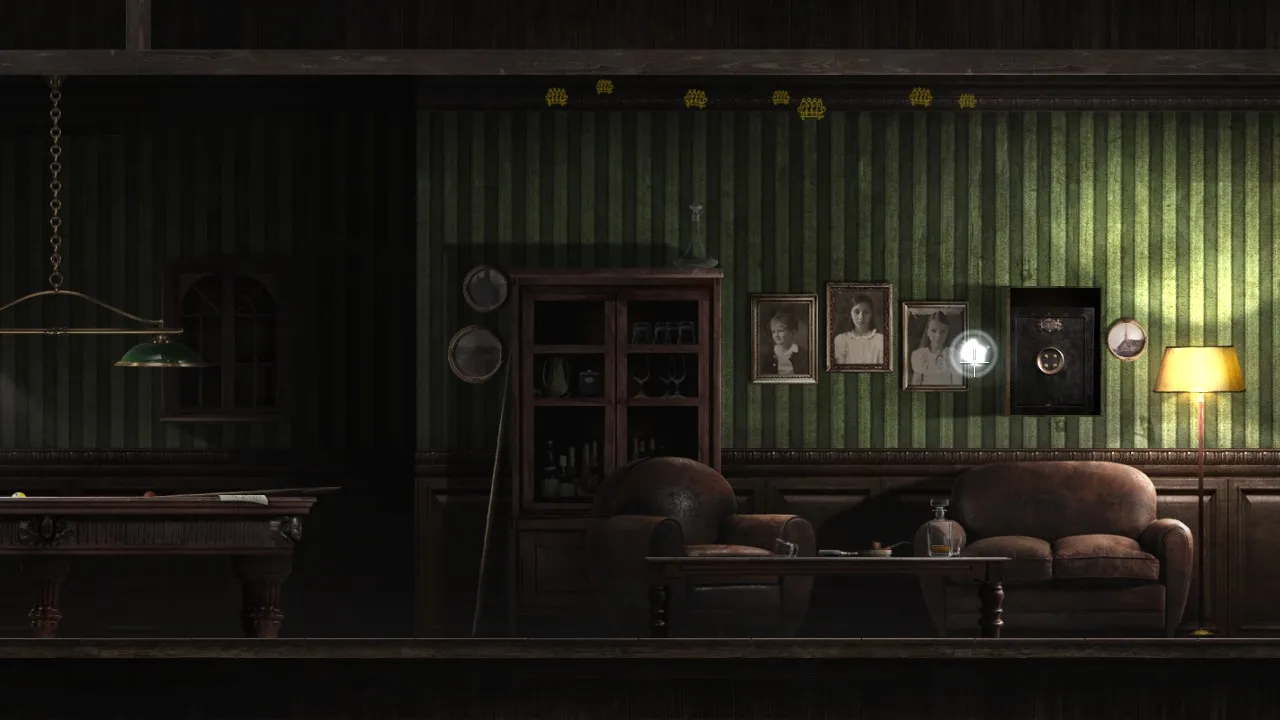
- Fly right into new area. Fly up and left into billiard room.
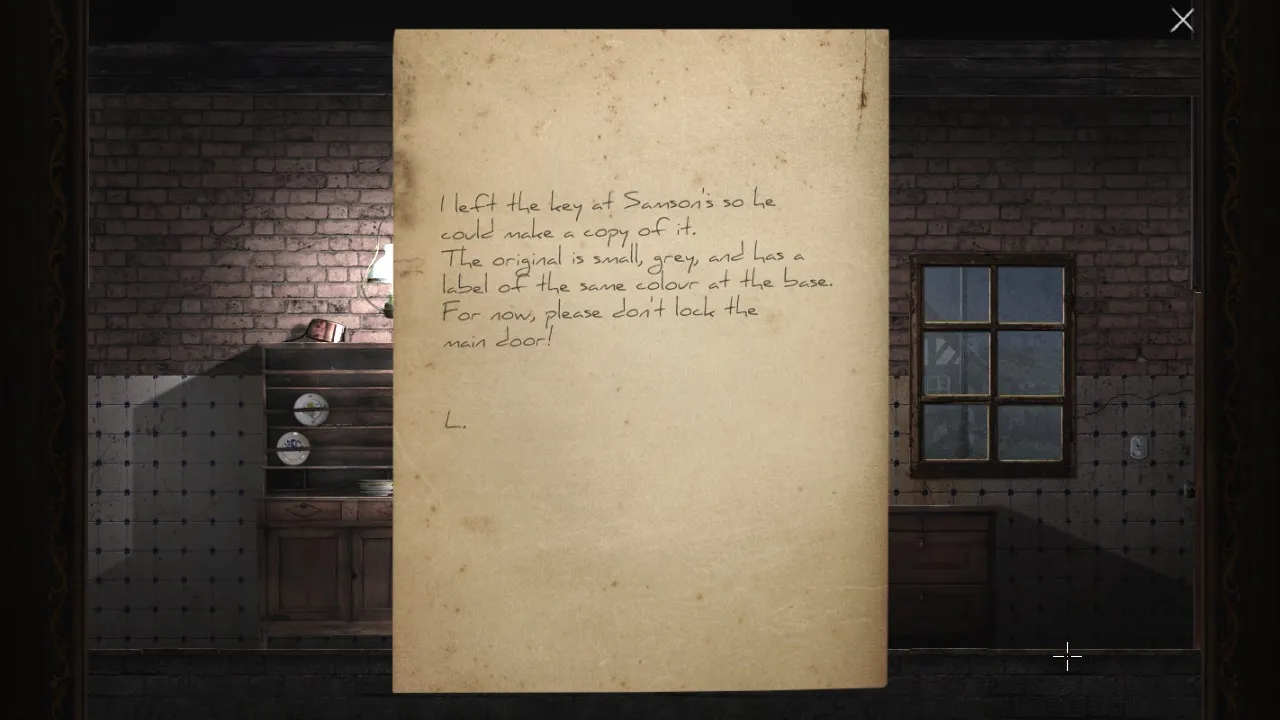
Codex: My dearest son letter. Oakmarsh village now accessible.
- Fly right into statues corridor.
- Take screwdriver. Fly back to billiards room. Use screwdriver on panel. Find safe. (Locked for now.)
- Fly right to end of area.
Codex: Forest painting. Forest now accessible.- Return to stairwell and fly up and to the right. Enter darkroom.
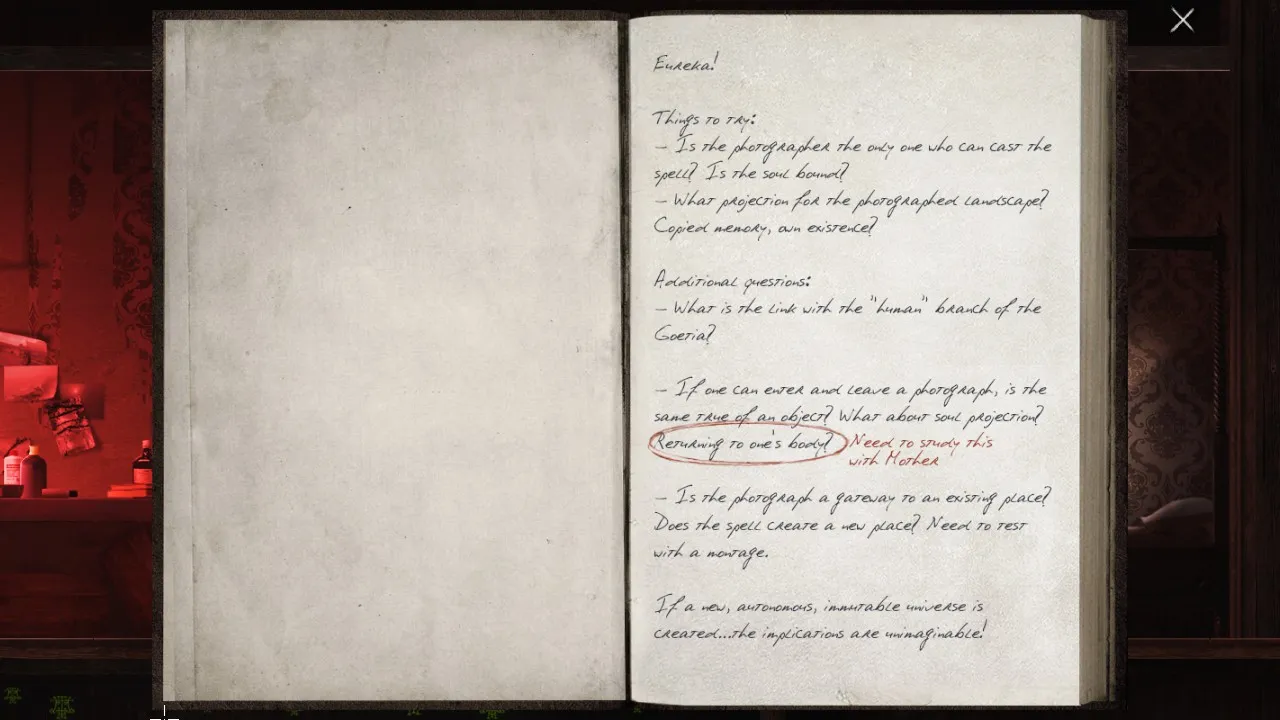
Codex: Eureka! Picture (in this room) now accessible. (Ignore for now.)
-
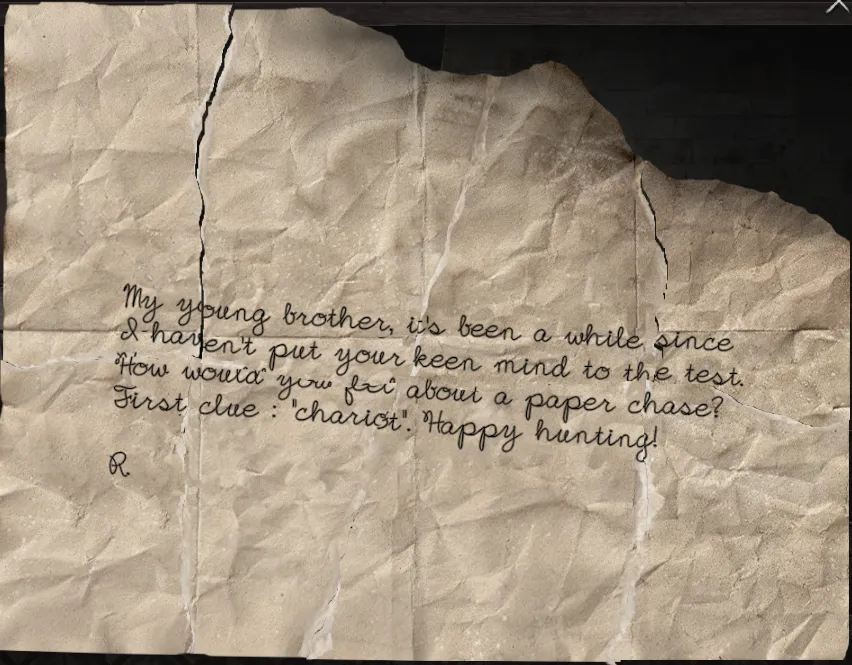
Complete the puzzle in the fireplace in the manor kitchen. Make sure that the game clearly indicates it as done. (Journal will flash) (See above Torn pages). (Paper Chase Part One.)
-
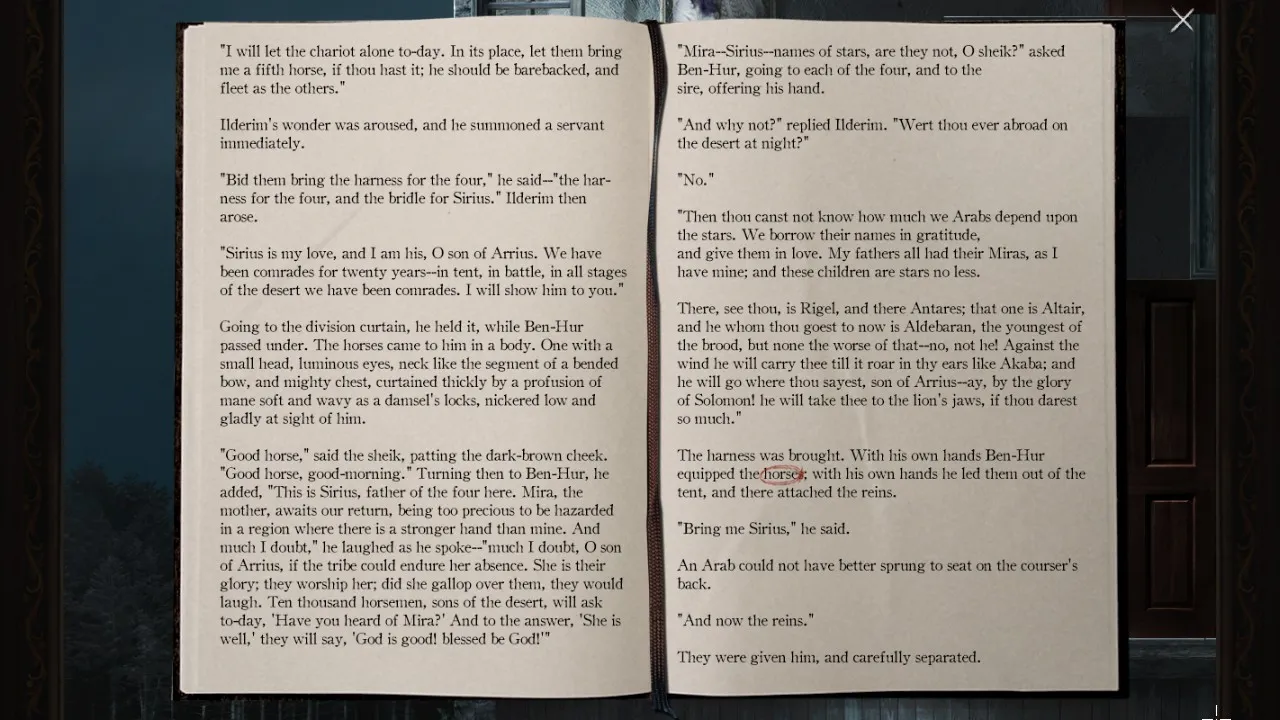
Codex: Ben Hur book (Above front door). (Paper Chase Part Two.)
- Go to the Office room with Horse statue on top of a cabinet. Move the horse to reveal a paper beneath.
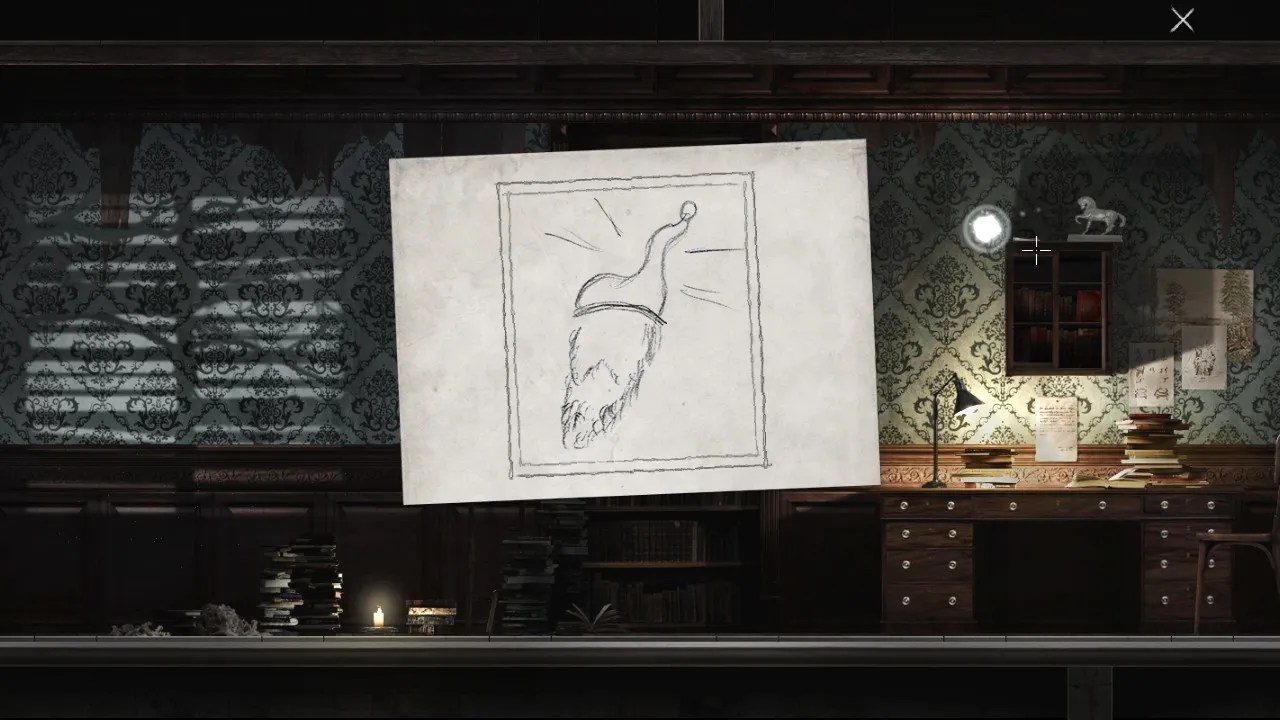
Codex: Drawing of sleeping cap. (Paper Chase Part Three.)- Examine painting matching that silhouette in first floor hallway. (Paper Chase Part Four.)
- Fly down to first floor and exit right, to office with crows.
- Solve puzzle box.
Solution: (click to expand)
JOHN - Sealed room is now accessible. (Paper Chase Part Five.)
- Fly to sealed room (Next to the kitchen, fly down from Father’s armchair).
- Absorb powerup.
Steam achievement: “Clear-sightedness Discover the power of Vision.”
- Fly up and to the left. Pick up quill pen.
- Fly up. Secret panel now revealed. Examine contents.
- Return to office with puzzle box. Pick up journal. Carry journal outside, towards the forest. Secret brick now revealed.
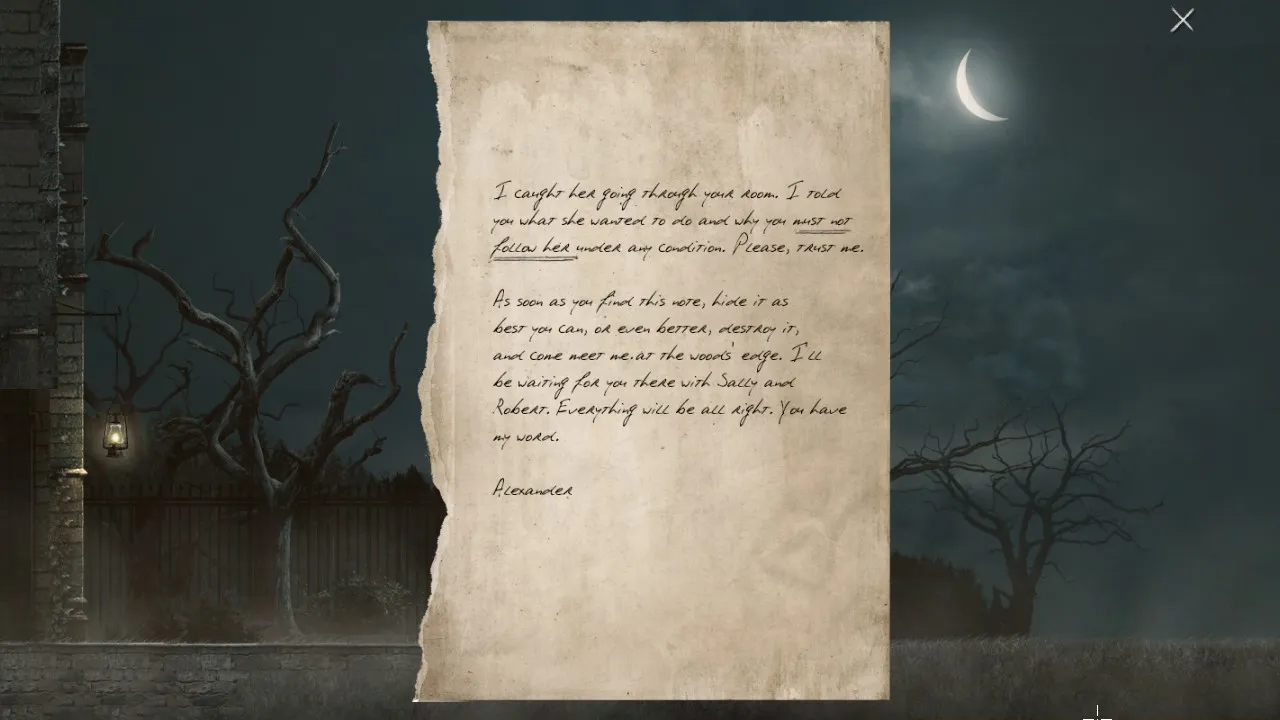
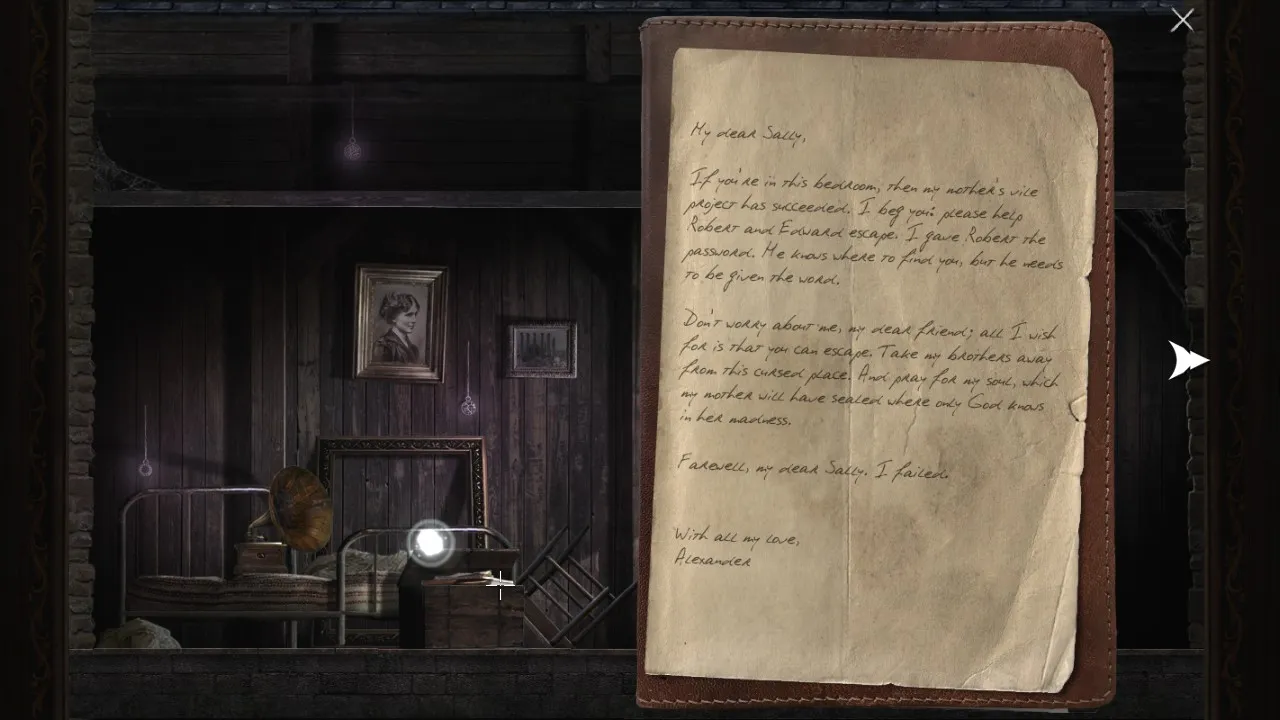
Codex: I caught her going through your room.
2 Part 2: Oakmarsh
- Fly left into first house.
- Open cabinet.
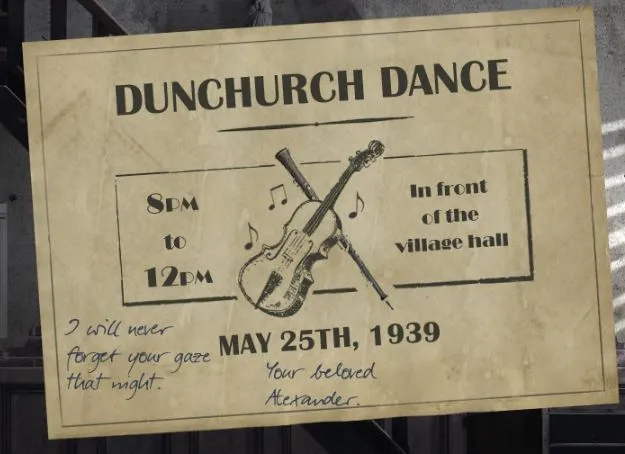
Codex: Dunchurch Dance brochure. (REMEMBER THIS.)
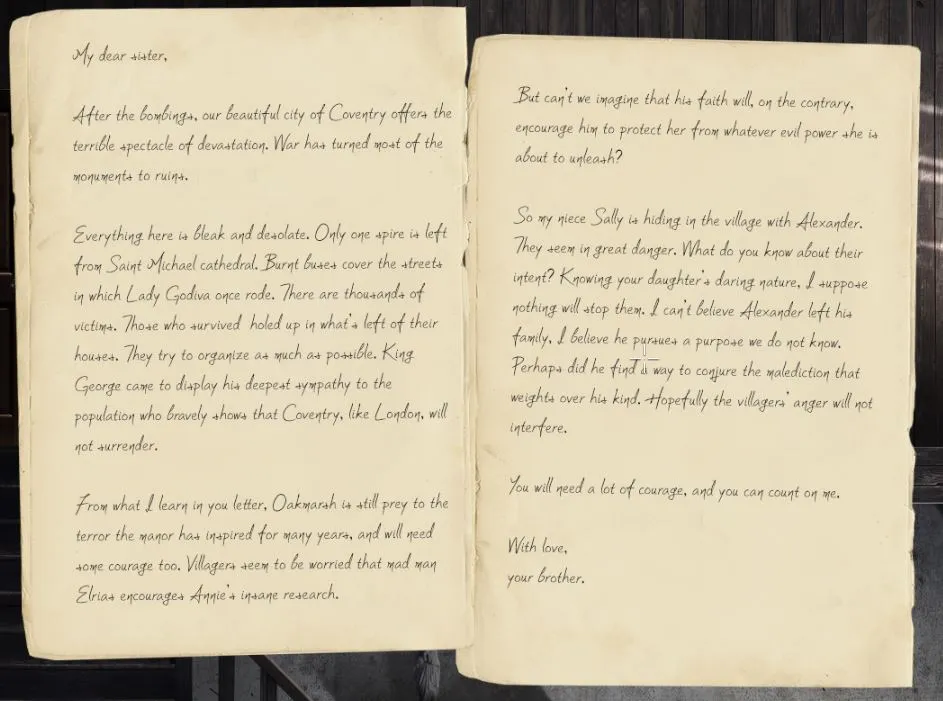
- Fly up to second floor.
Codex: Sister to brother letter.
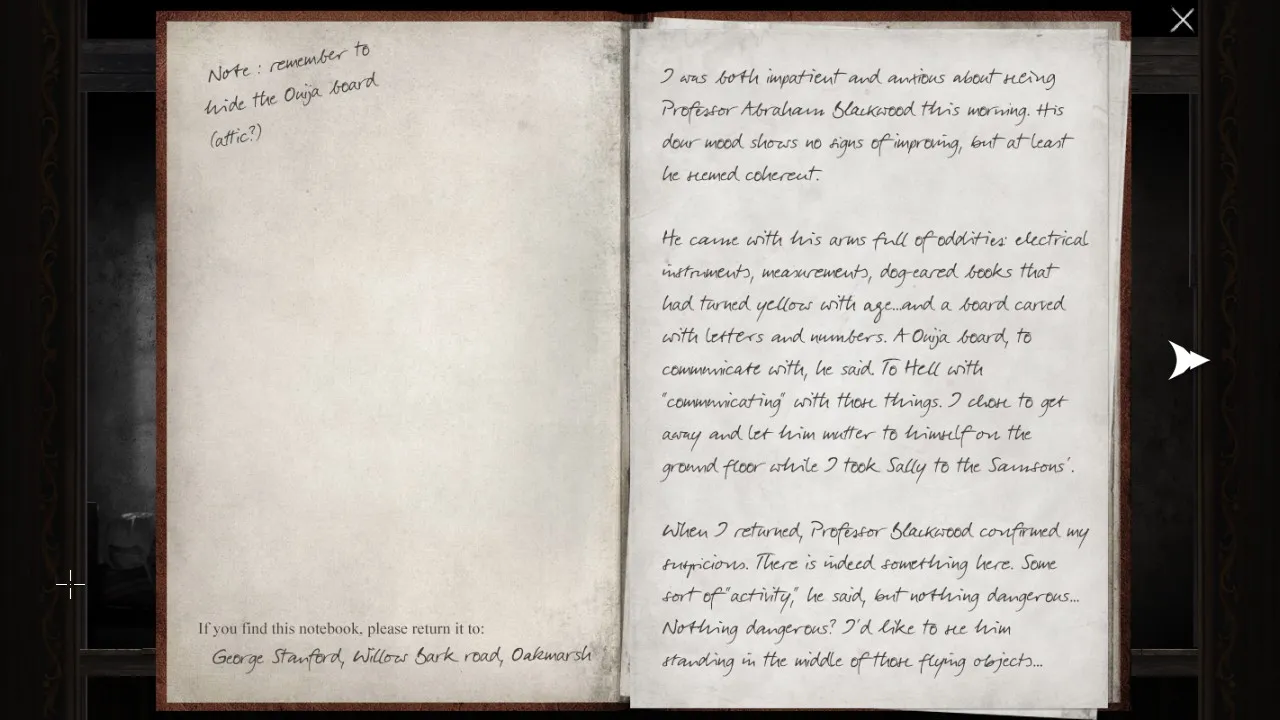
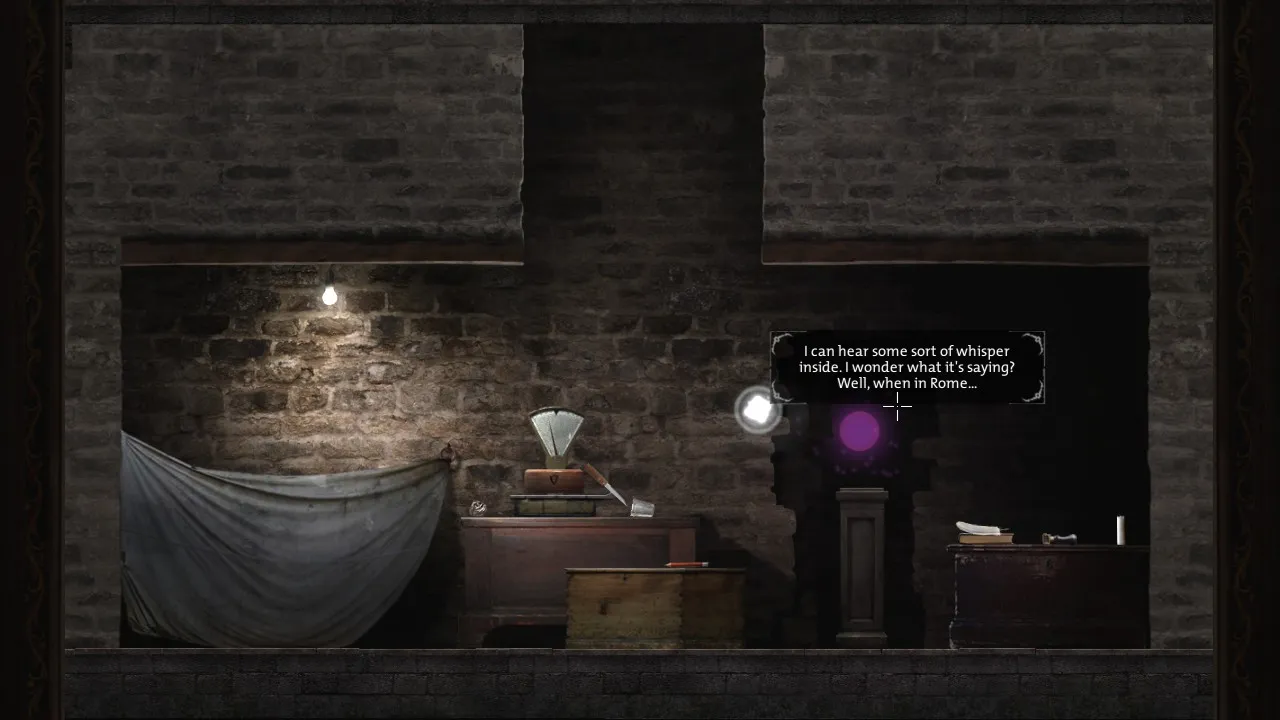
- Fly up to attic. Examine Ouija board. Get hint to box: “To the stars”
- Note that the journal recommends you attempt to guess identity of this spirit.
- Fly left, then down.
- Open cabinet.
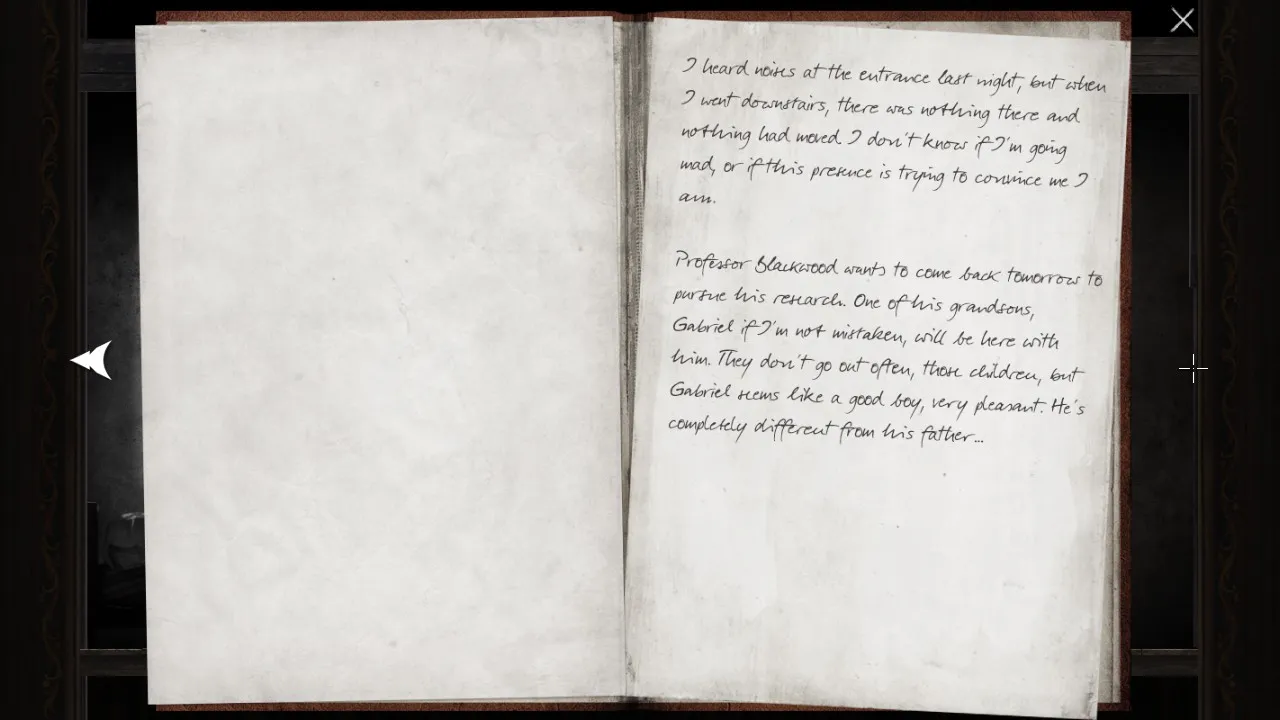
Codex: George Stanford journal. Read carefully.
- Fly up and identify Ouija spirit. Letters briefly light up if you placed the pointer on them well enough for the game to notice.
Solution: (click to expand)
ABRAHAM-
Chase spirit down, down, down.
-
Solve vague puzzle.
-
Objective: (click to expand)
Pile items on the scale until the weight is JUST BELOW the mark. -
One Solution: (click to expand)
Box, ink stamp, knife, feather.
-
-
Absorb powerup.
Steam Achievement: “Crossing the Styx Discover the power of the Ferryman.”
-
Fly back to room with George Stanford journal. Examine box. Recall hint: “To the stars”.
-
Gentle hint: (click to expand)
How might these creatures rank, in terms of going to the stars? -
Medium hint: (click to expand)
How close to the stars can these individual animals (fish, eagle, dog, snake, dolphin) get on their own? -
Solution: (click to expand)
Pisces, Delphinus, Serpens, Canis Major, Aquila
-
-
Read note, take tape
- Fly right, down, left. Drop tape.
- Close door, turn on lights.
Codex: Key note.
- Fly left into store.
- Fly up to the floor above the store.
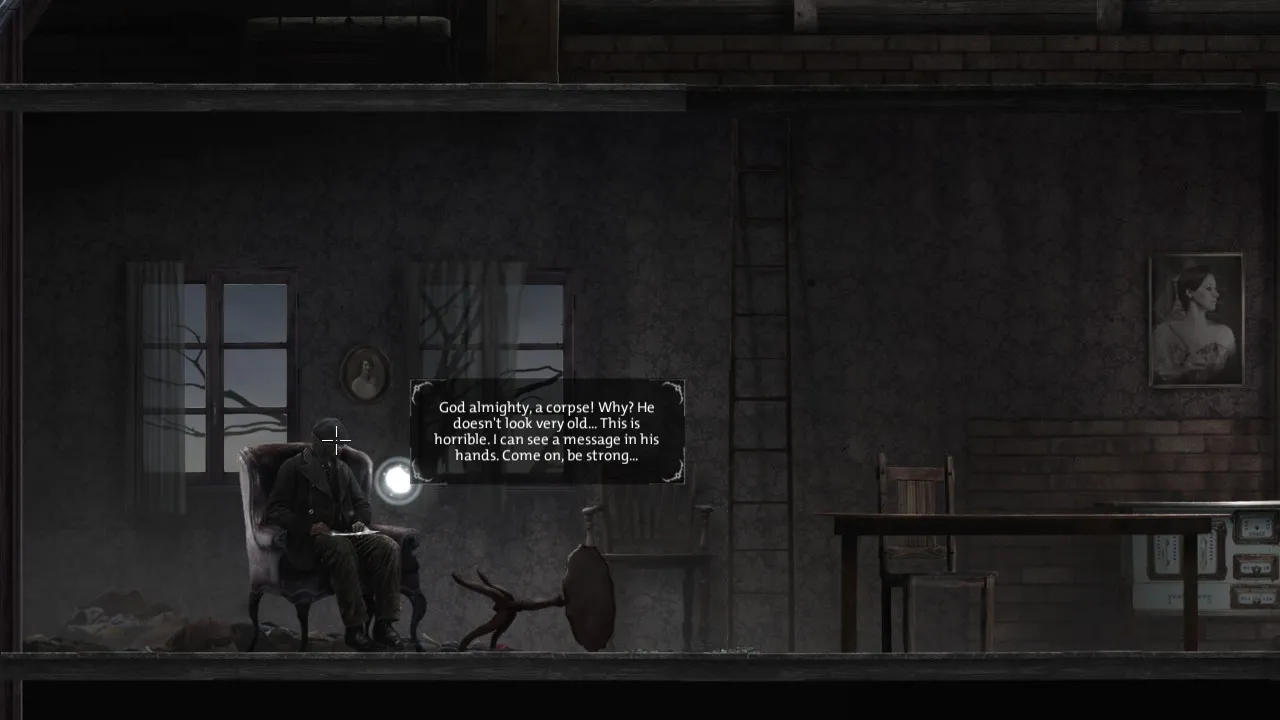
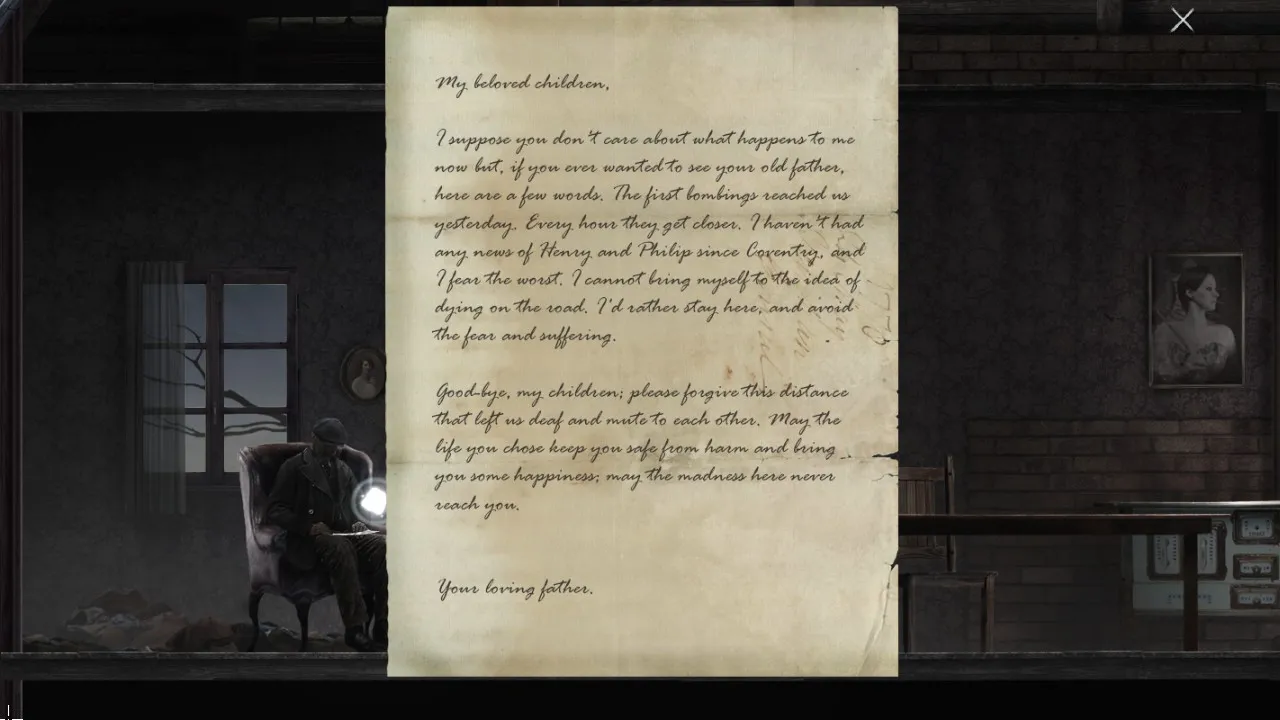
Codex: Corpse note.
- Fly back to store.
- Take key described in earlier note.
- Fly key back to locked kitchen door.
- Unlock door.
- Pick tape back up, fly it into the well to the left. Drop it. Pick up handle.
- Use handle on cracks. Drop handle. Pick up tape. Continue to the left.
Codex: Logbook.
- Fly tape up and to the left. Use tape on player. Listen to clue.
- Fly up and to the left.
- Pick up saw, fly it right, use it to open hatch to the tape player.
- Fly left and down. Find radio. Spin right dial until you can hear your own voice. (Location noted in spoiler pic.)

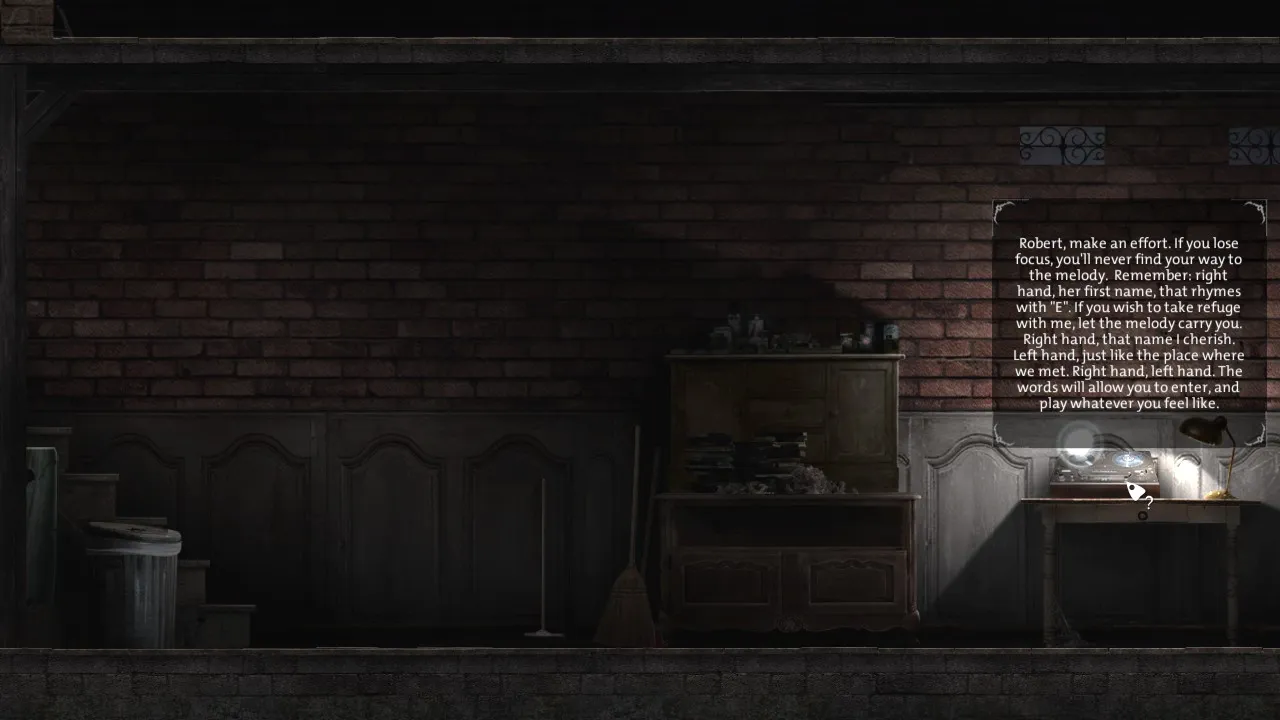
- Carry radio up to the microphone door. Use radio on door. Solve puzzle.
-
Gentle hint: (click to expand)
Do what the tape says, remembering the brochure from earlier. -
Solution: (click to expand)
Type: "Sally Dunchurch"
-
- Drop radio.
- Fly left.
Codex: Paimon counter-sigil.Steam Achievement: “Ghost town Find Paimon’s opposite sigil in Oakmarsh.”- Yellow-sealed walls are now accessible.
3 Part 3: Eldwitch Forest
- Fly through the manor all the way to the right and leave the grounds.
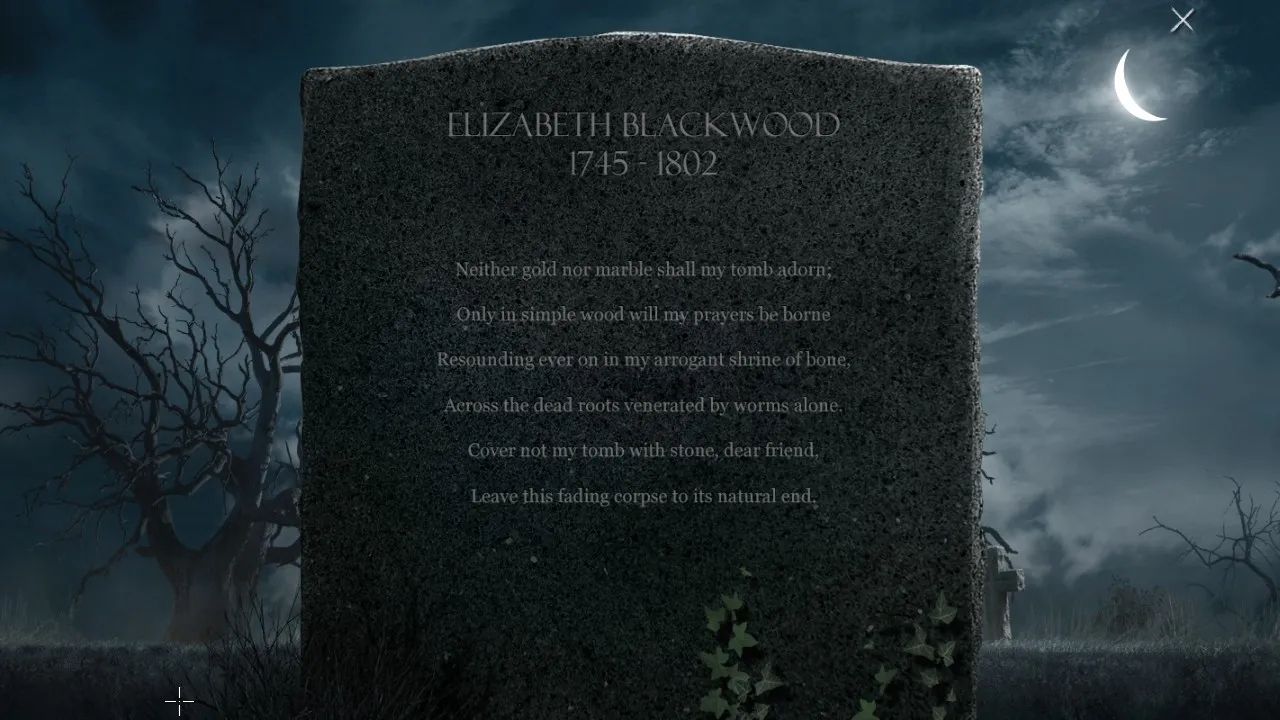
Codex: Tombstone. Read carefully.
- Fly down into grave.
- Pick up stone wedged in corner. Remove it to the left.
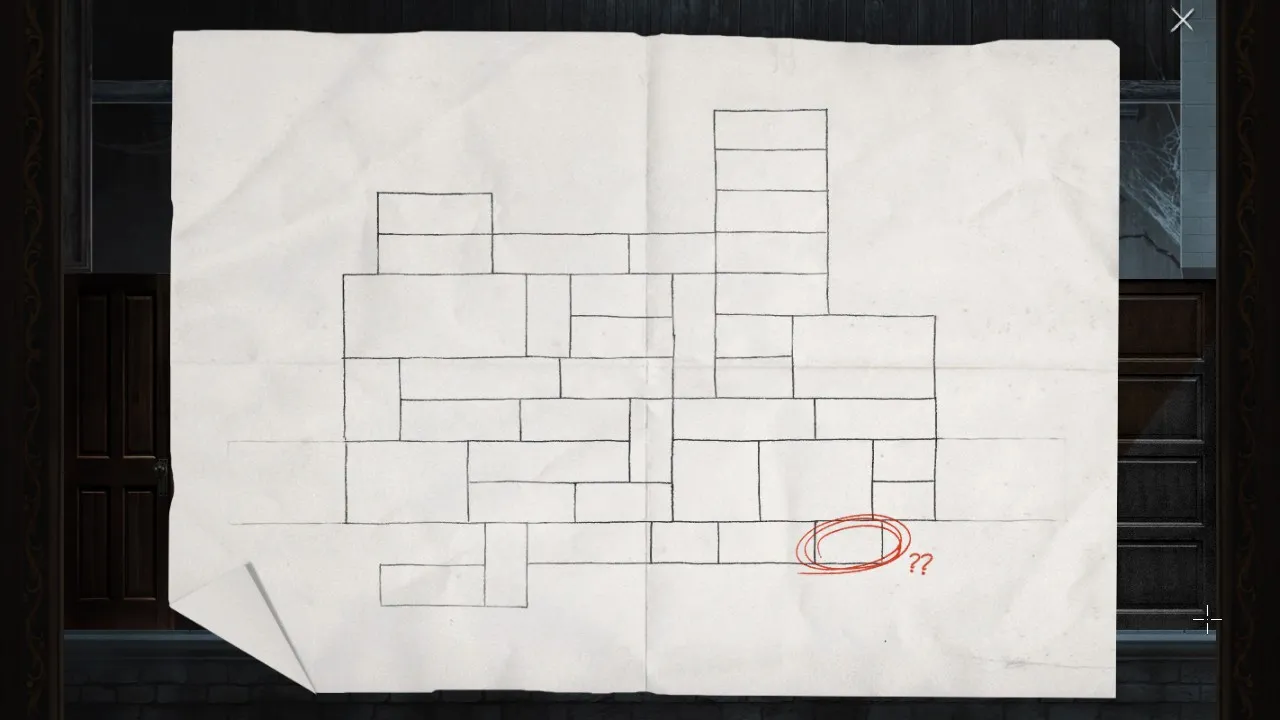
- Pick up dowsing rod. Fly it up and out through the stone’s tunnel. You can optionally use dowsing rod with the upcoming puzzle box, it will shake when pointed to correct images.
- Continue all the way to the right. Notice forest is inaccesible.
- Retrace steps left. Notice portal. (Portal only present if you have the needed powerup.) Enter portal. Look around. Note what’s in the forest.
- Search grass in front of archway. Find box.
- Solve box puzzle.
-
Gentle hint: (click to expand)
Combine nearby tombstone text with observations made while -
Solution: (click to expand)
Logs, Skull, Cross, Dead Tree, Stone
-
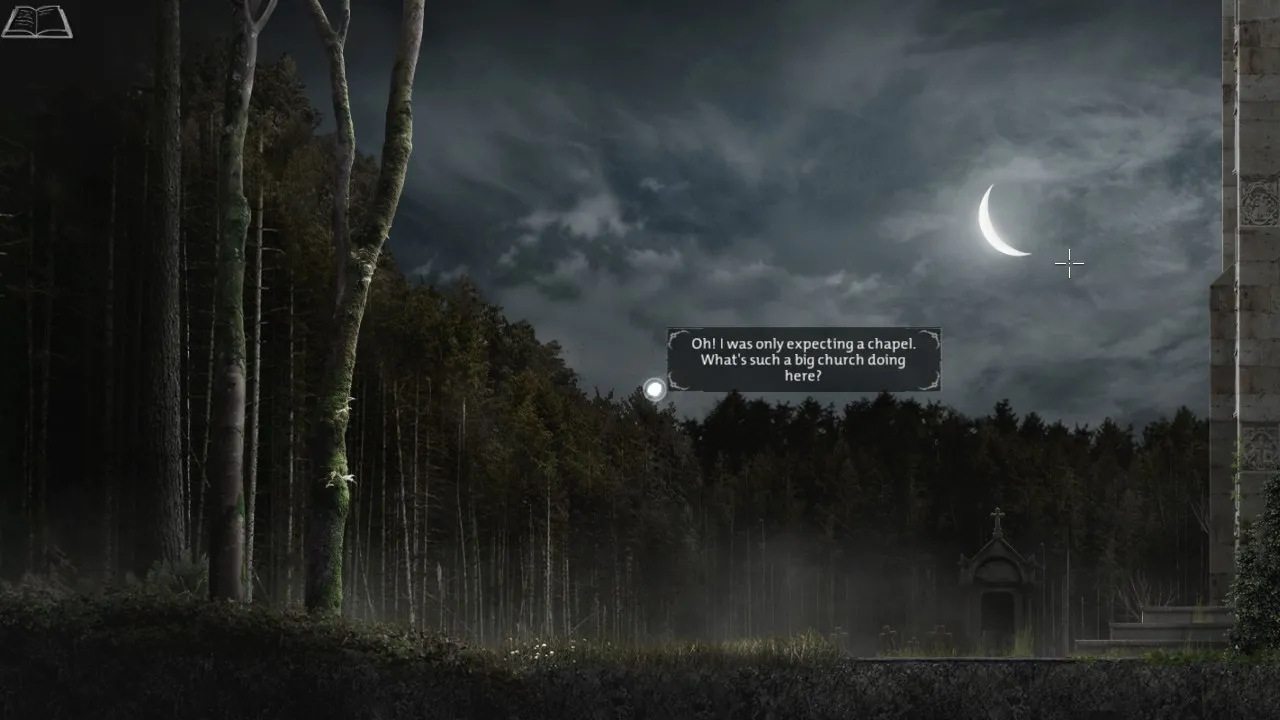
- Deep forest now accessible.
- Fly all the way right, into the chapel
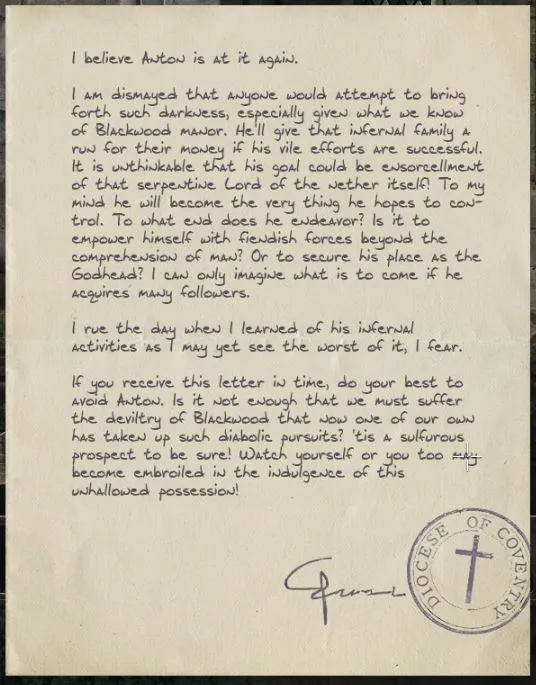
Codex: Anton at it again letter.
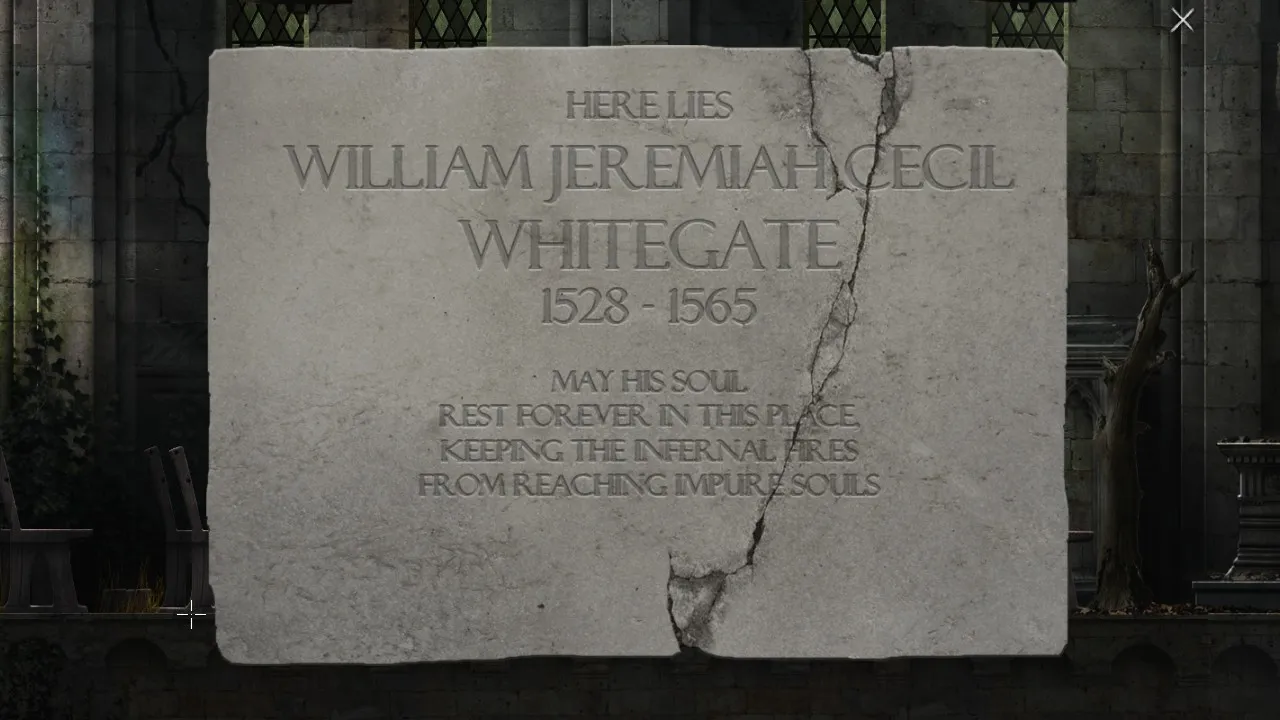
Codex: Whitegate cornerstone.
- Cutscene.
- Fly up above chapel.
- Examine bell. Note markings.
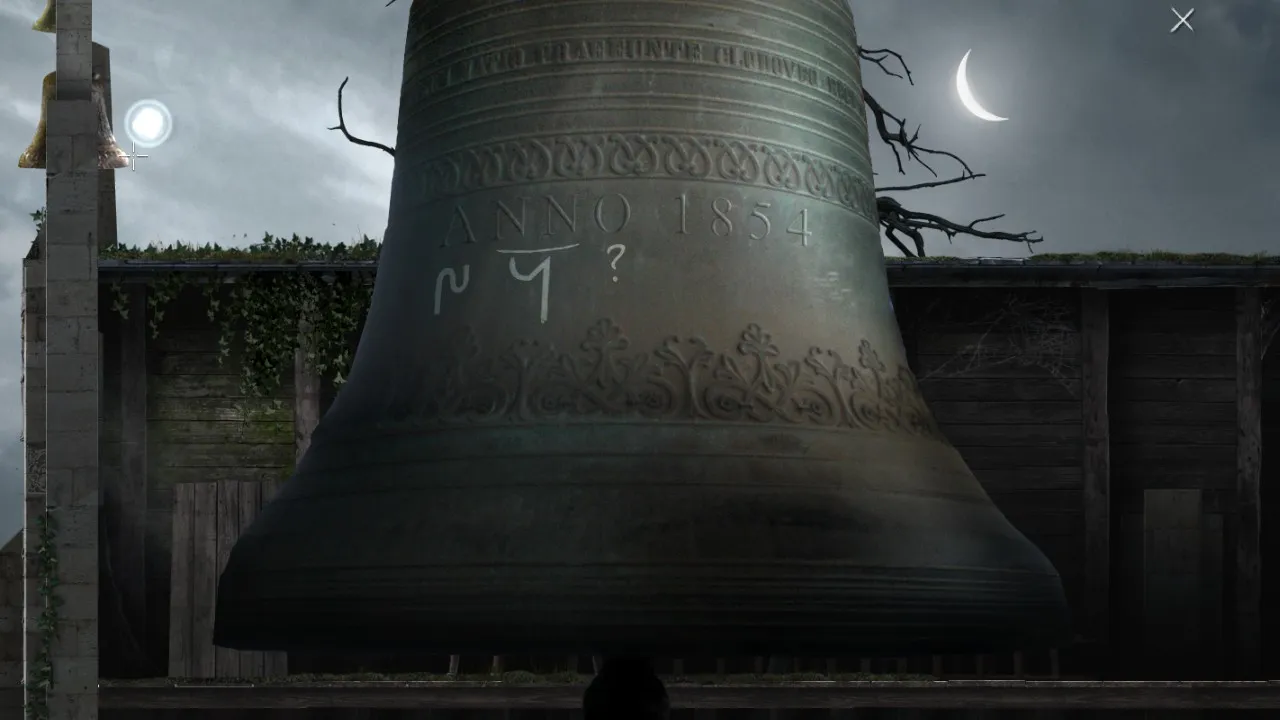
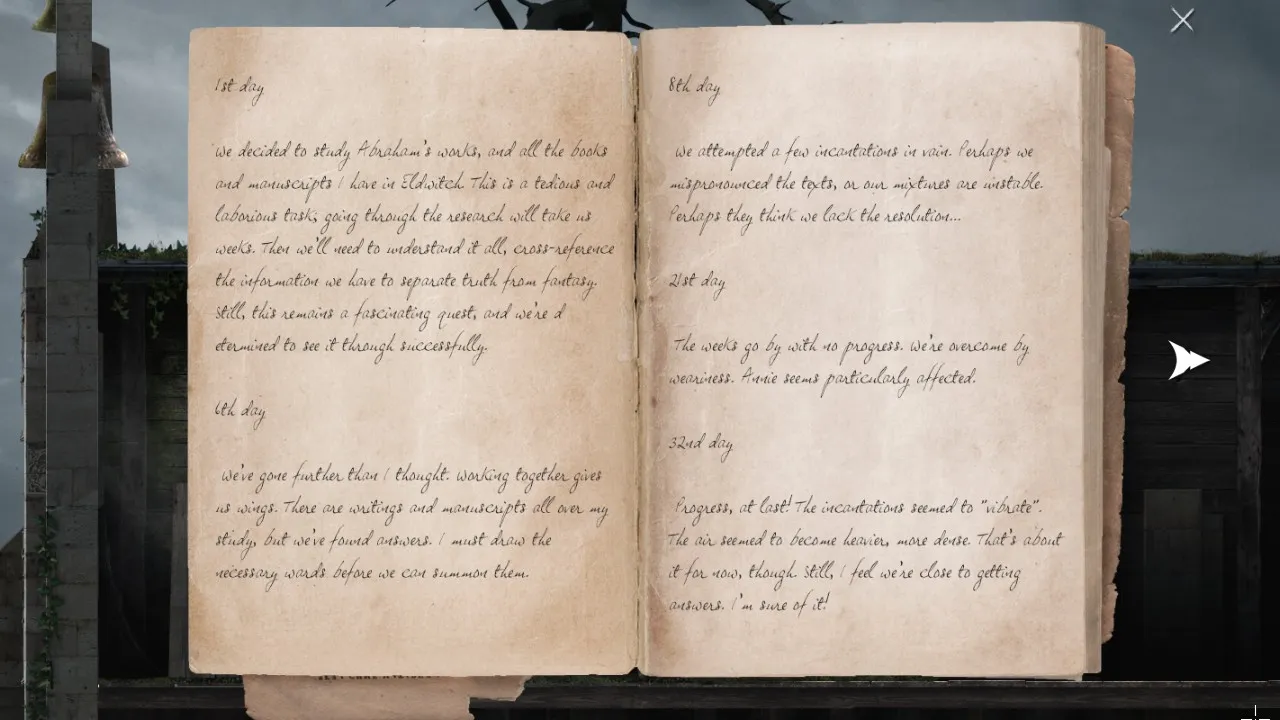
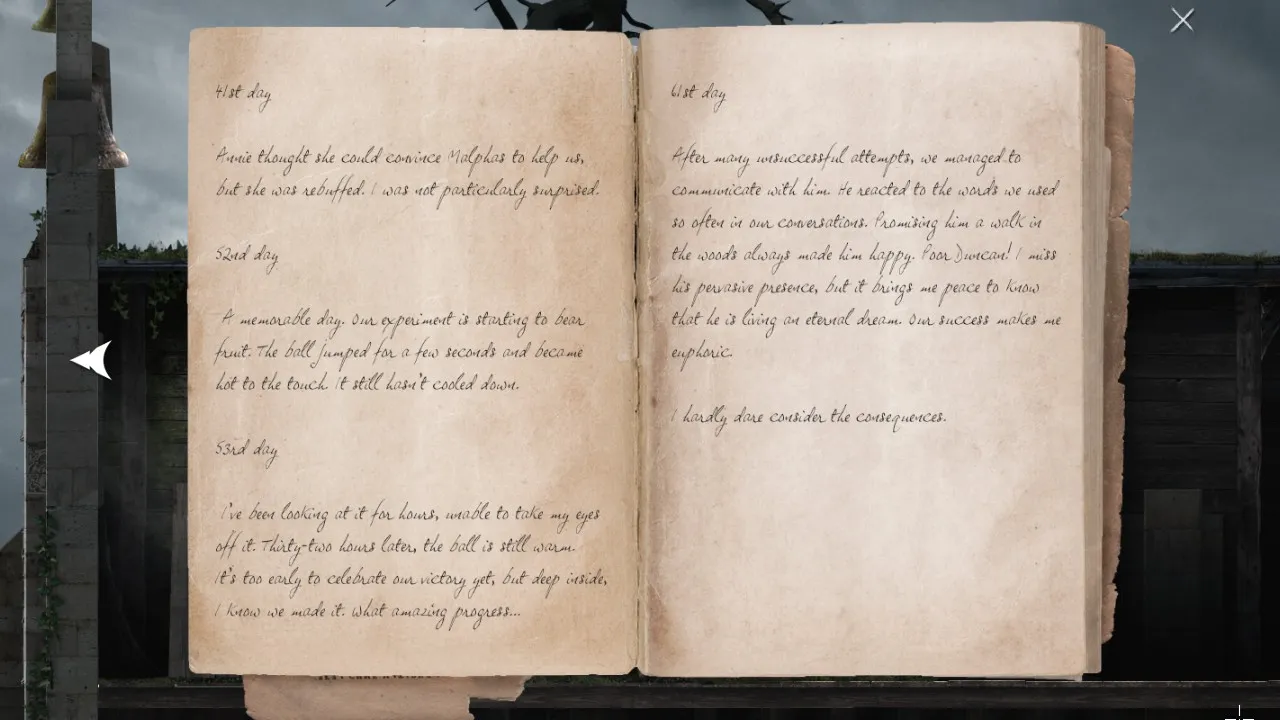
Codex: Progress journal
- Fly down and to the right.
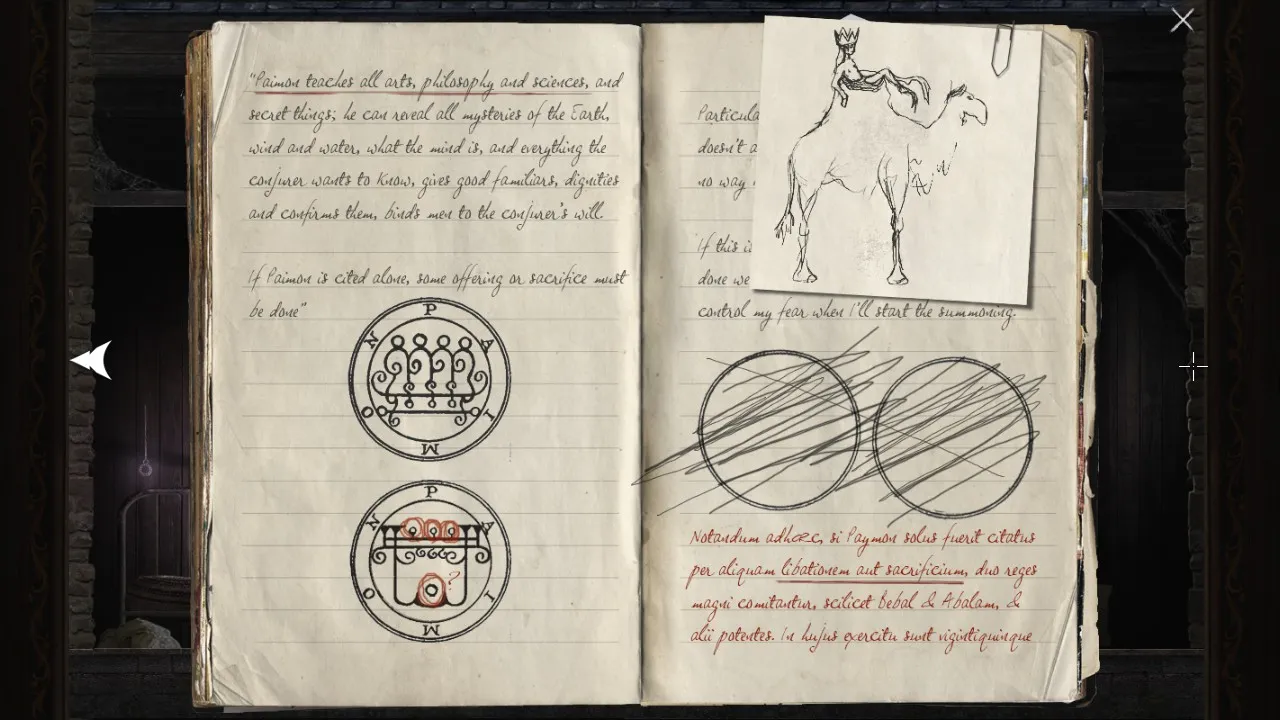
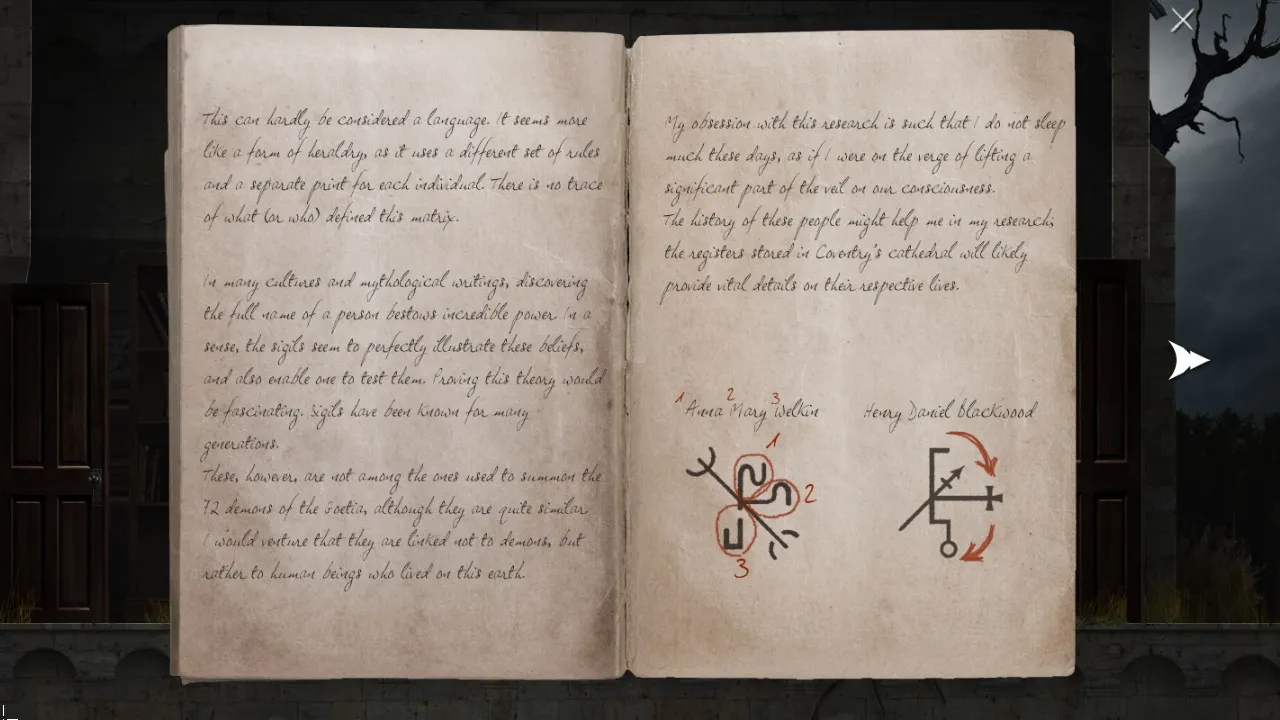
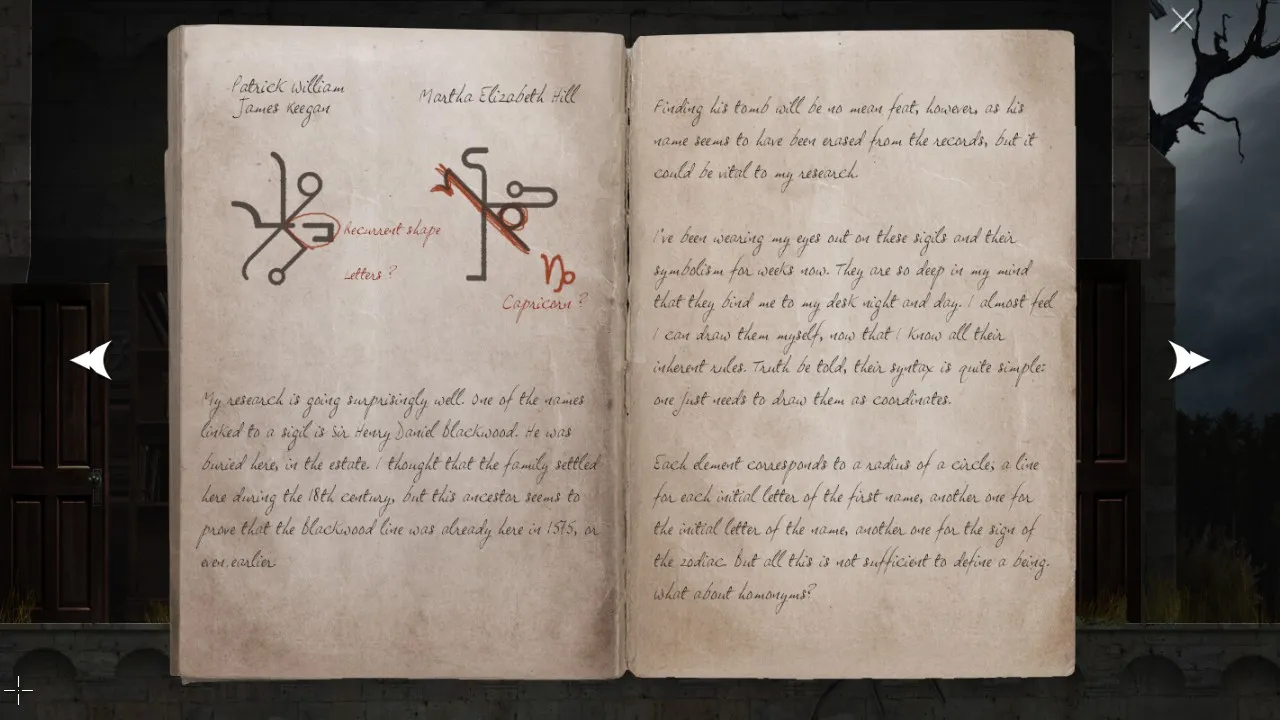
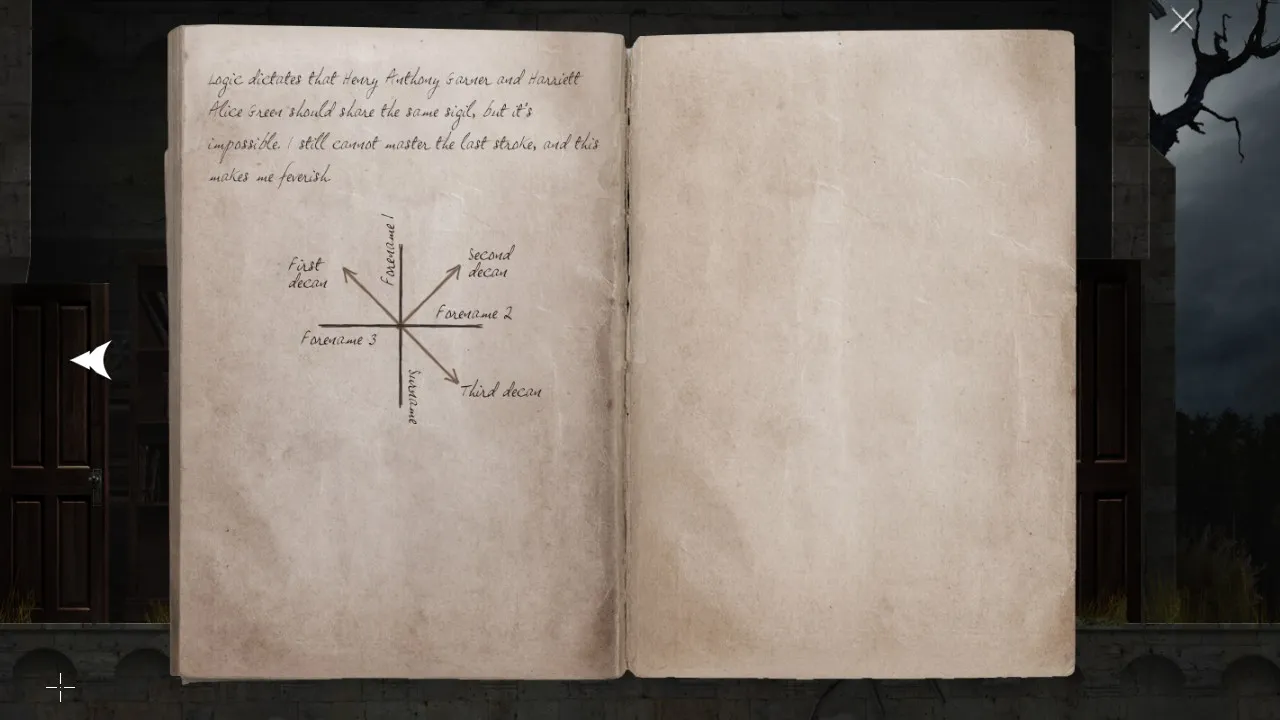
Codex: Sigil notes. Read carefully!
- Open cabinet.
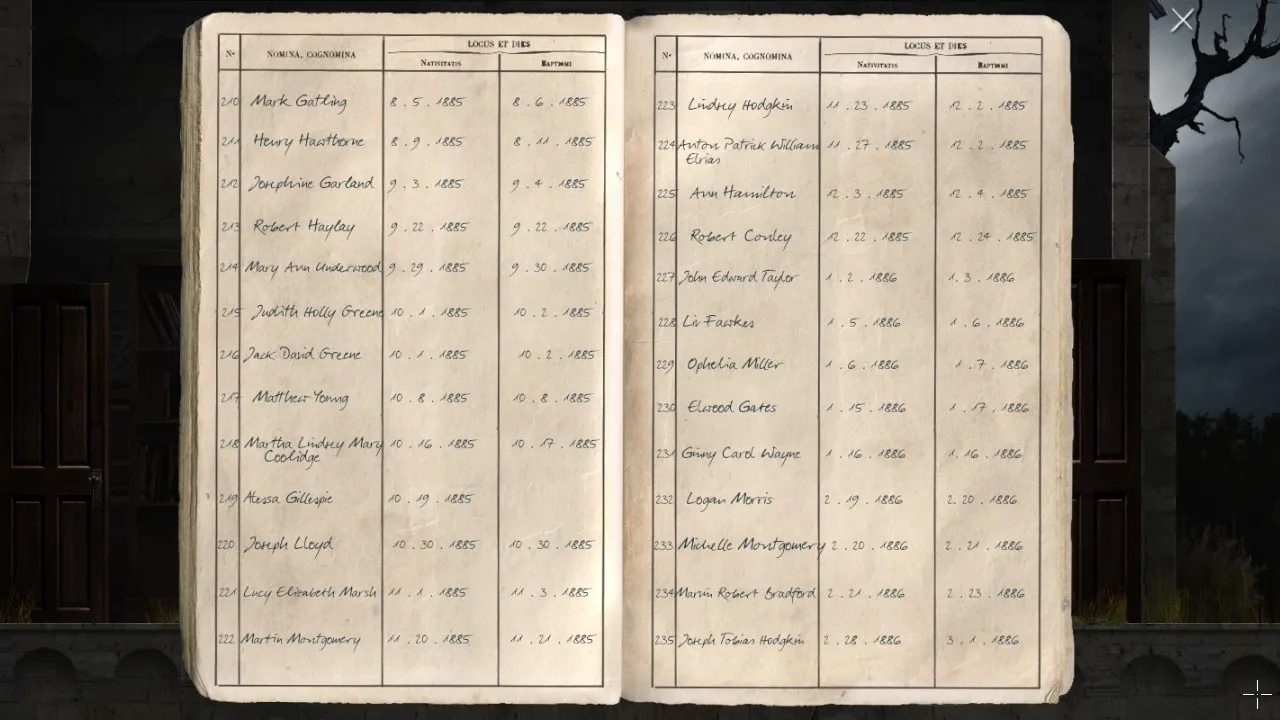
Codex: Register. Read carefully!
- Take hook.
- I’m currently at this part. Will be continue soon.
Note: The “Click to fold” picture box sometimes only opens halfway. To fully enlarge it, try closing and reopening it.